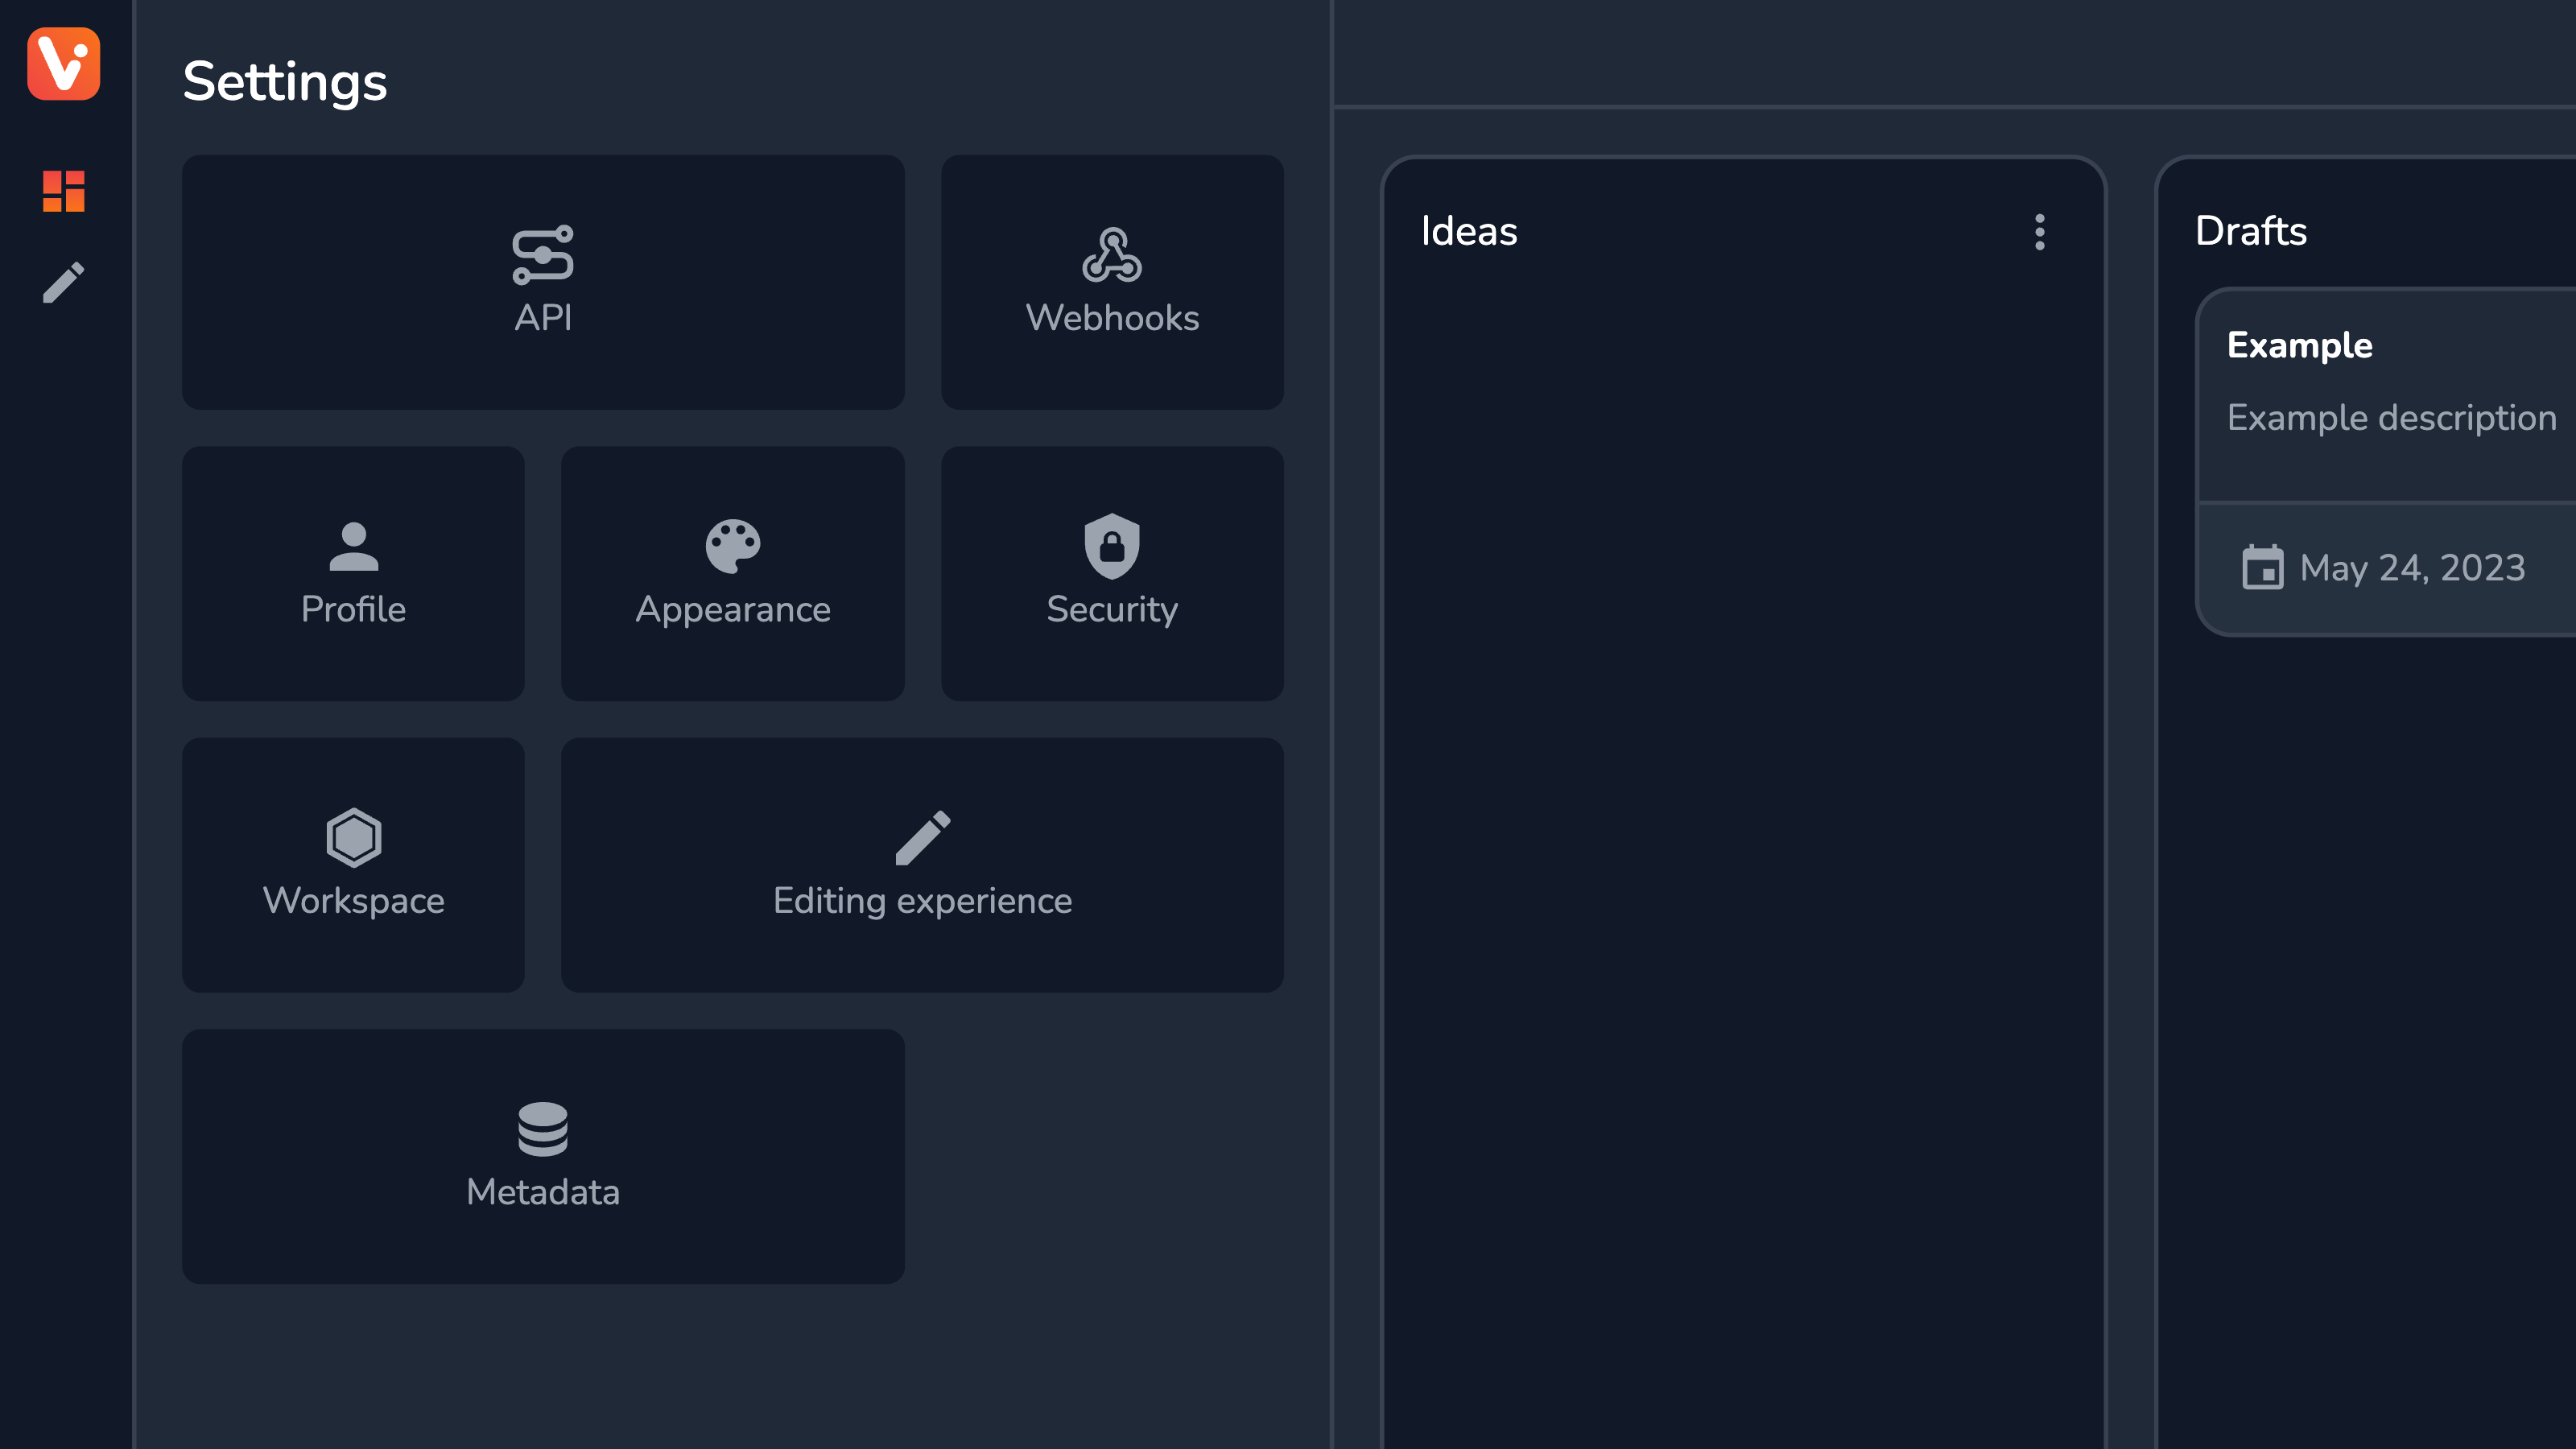
Configuring Vrite
Everything related to configuring Vrite can be done from the settings side panel. From managing API tokens to customizing the editing experience — all can be managed in the settings.
It’s worth noting that there are 2 categories of settings in Vrite:
- Workspace-bound — settings that are configured for the entire workspace. When configured, all the members of the workspace will see them in effect;
- User-bound — personal settings of the user that affect only his own experience and how he is seen by other users, across all workspaces; These include Profile, Appearance, and Security settings;
Managing API Tokens
To access any data from Vrite through the API you’ll need an API access token. You can create and manage those in the API section of the settings.
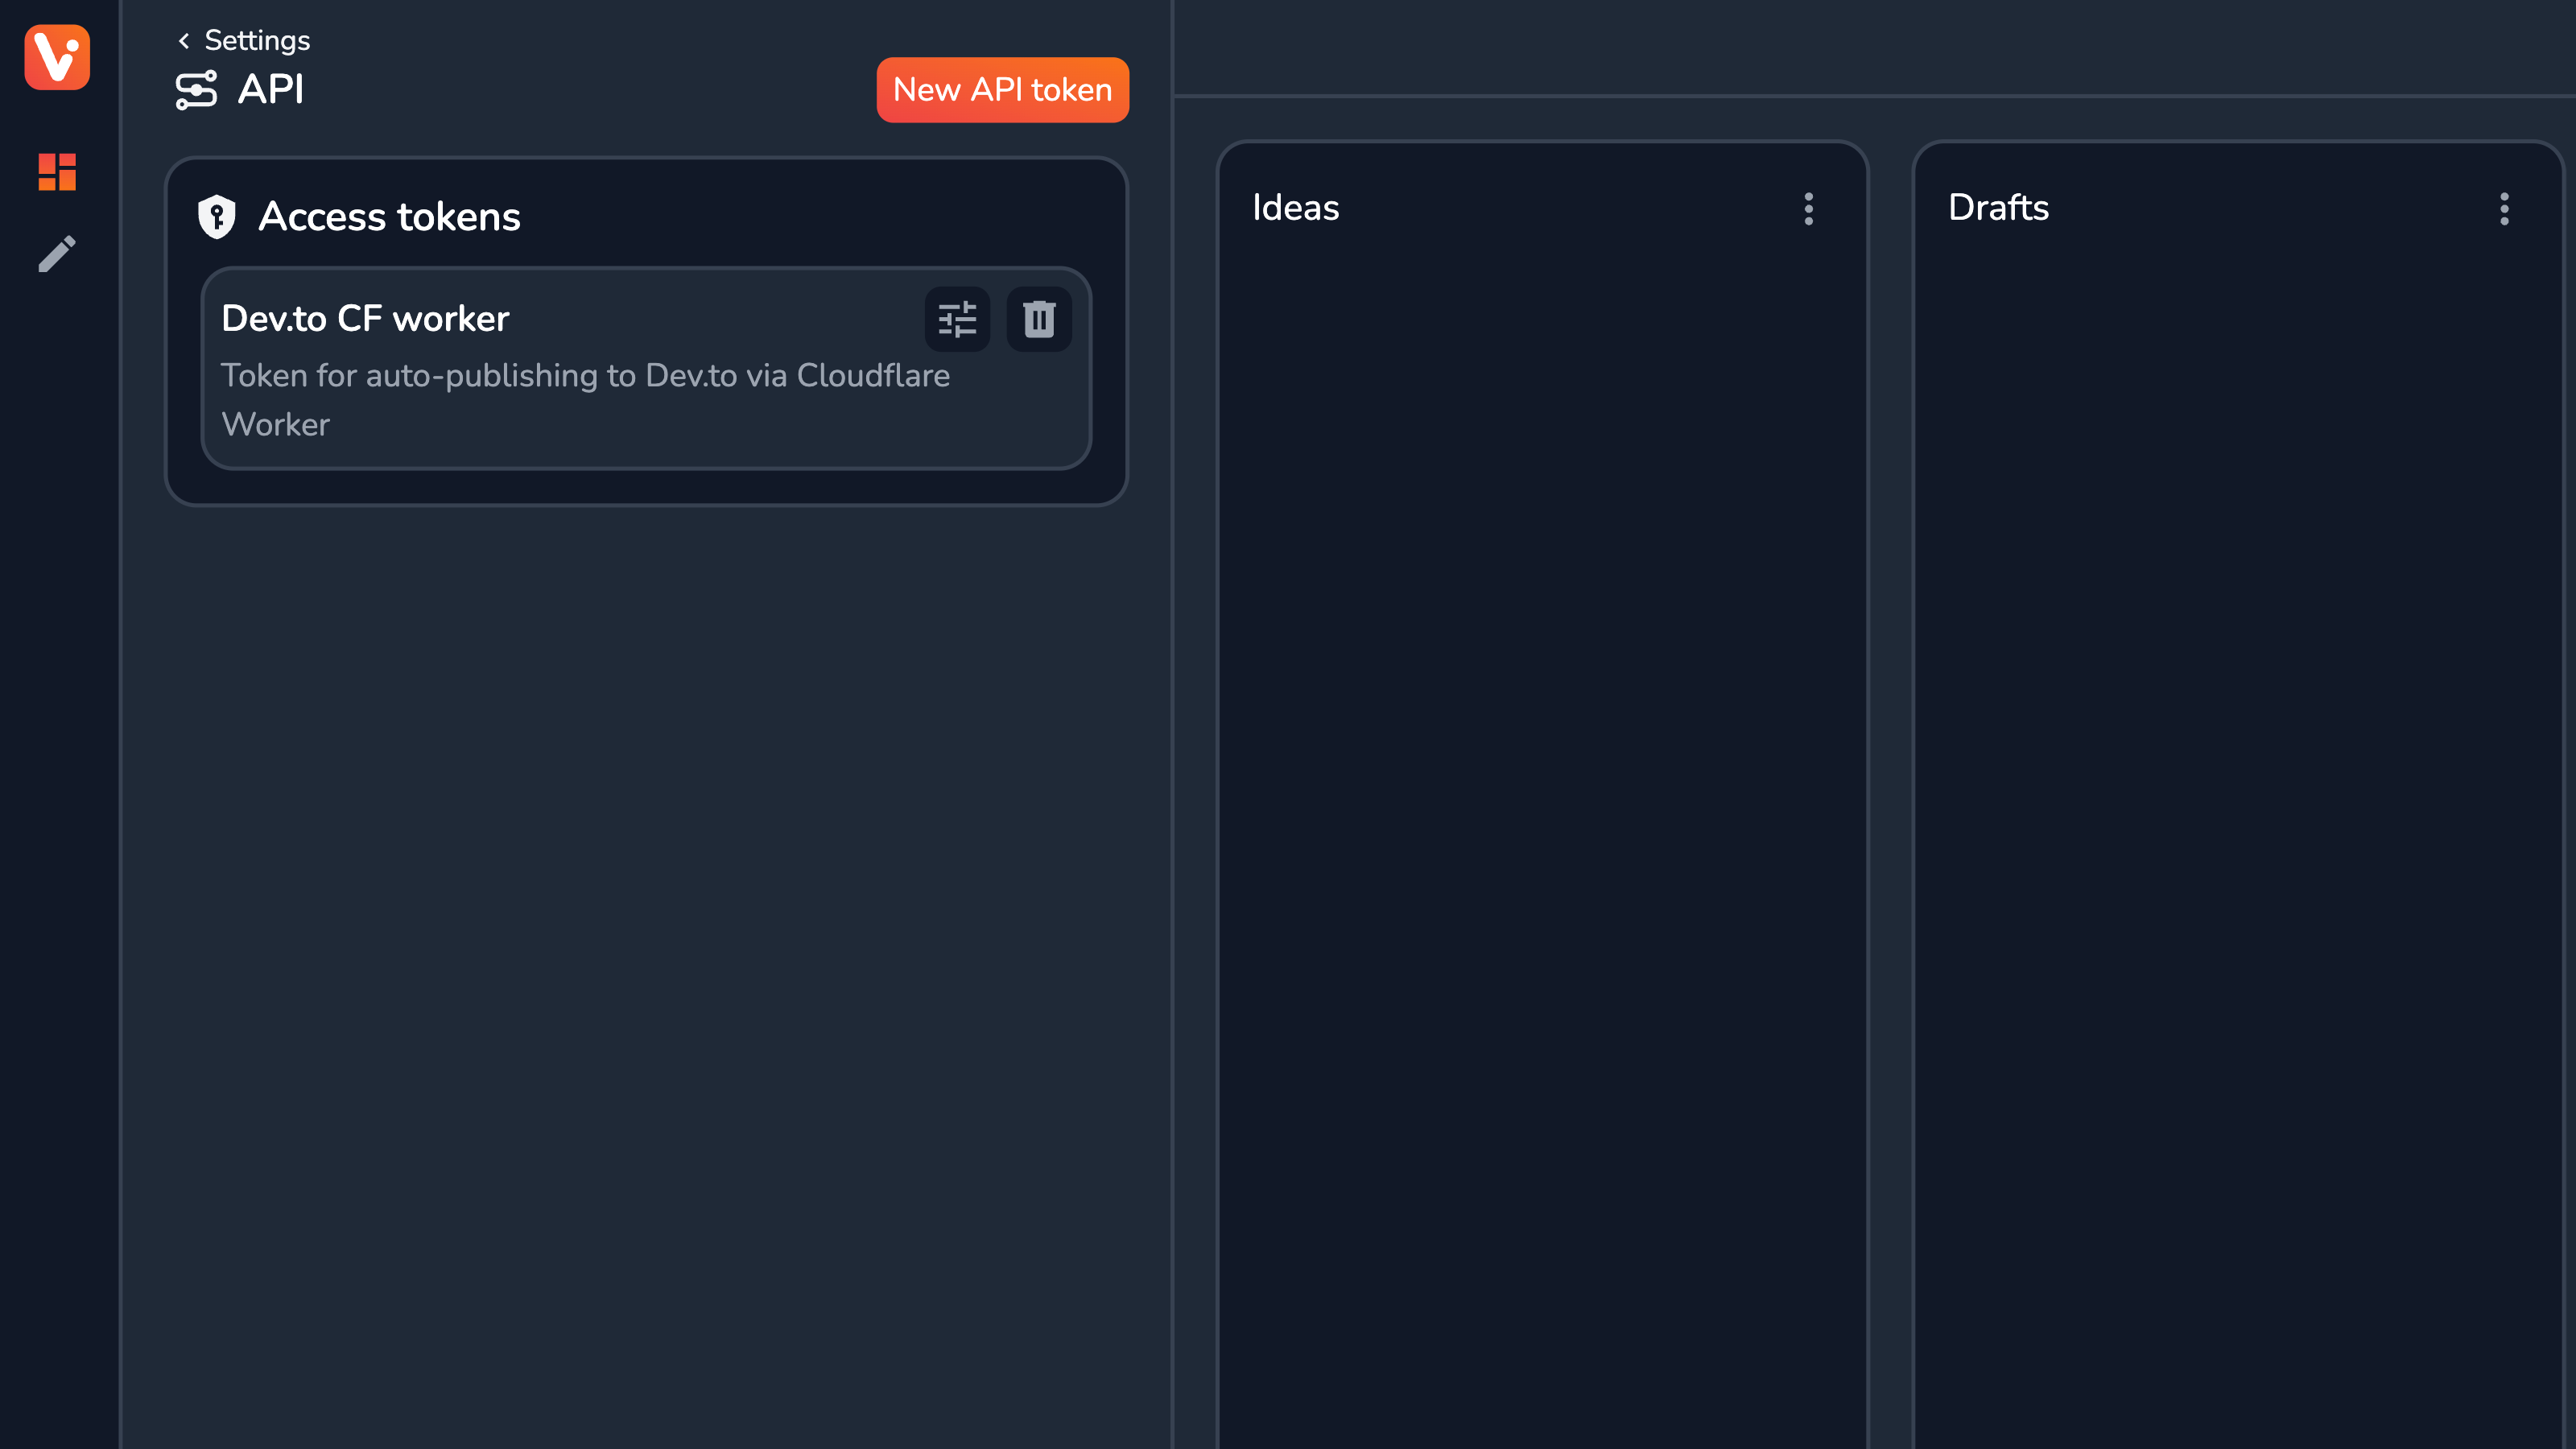
From here you can:
- View a list of created API tokens, along with their names and descriptions;
- Create new API tokens (New API token button in the top-right)
- Edit existing API tokens (Edit button on the token card)
- Delete existing API tokens (Delete button on the token card)
Creating and Updating API Tokens
When creating or updating a token, you can customize its name, description, and permissions.
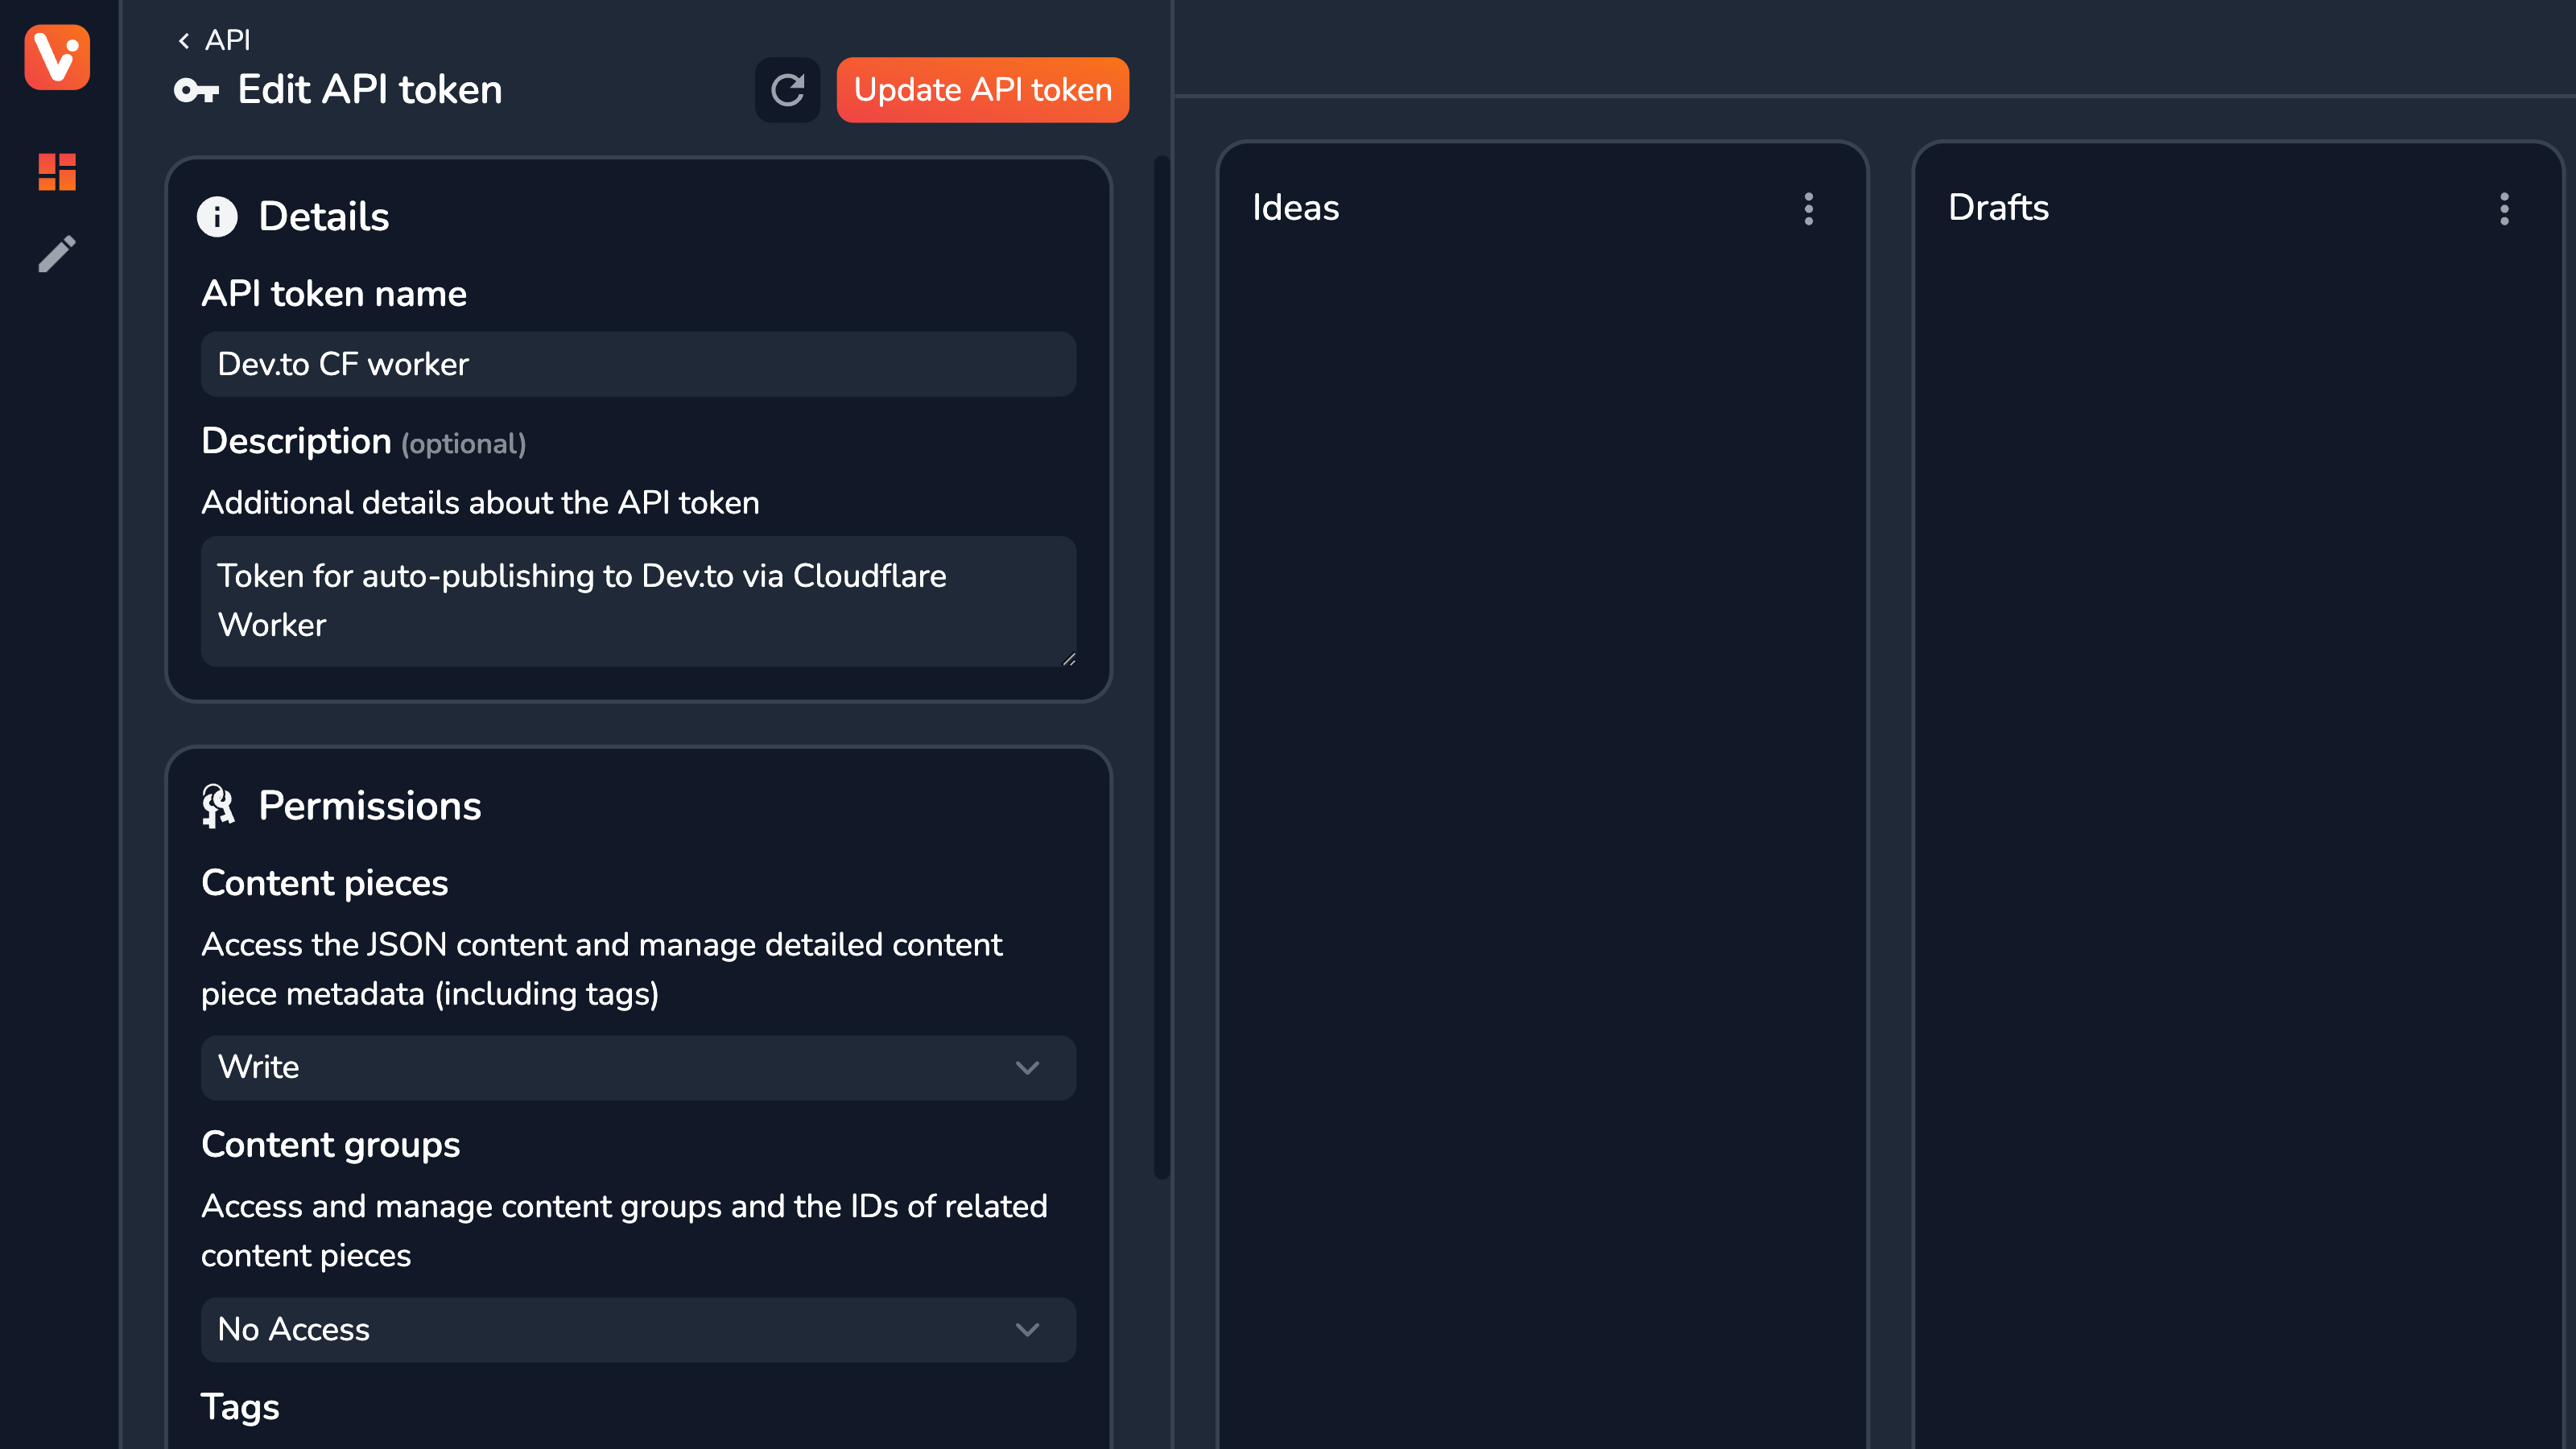
To finalize the action you can click the Create API token or Update API token button in the top-right corner. When the token is first created, its value will appear in a dedicated, topmost card. Store it securely, as you’ll only see it once.
When updating an existing token, you can also regenerate it using the Regenerate token button. A new, regenerated key will appear in the same way as it does when creating an entirely new token. Be careful though — upon regeneration, the previous key will become invalid.
Token Permission
Permissions are the most important details when configuring an API token. They dictate what API endpoints one can and can’t access with the given token.
Every token permission has 3 levels:
- No Access — default, blocks any access to related API endpoints;
- Read — allows access to retrieving the data from the API (mostly through related
GETendpoints); - Write — allows full access (both read and write) to all related endpoints;
The following token permissions are available in Vrite:
- Content pieces — access the JSON content and manage detailed content piece metadata (including tags);
- Content groups — access and manage content groups and the IDs of related content pieces;
- Tags — access and manage tags;
- User settings — access and manage your personal UI settings;
- Roles — access and manage roles in the workspace;
- Webhooks — access and manage Webhooks;
- Profile (read-only) — access your personal profile settings;
- Workspace members — access and manage workspace members;
- Workspace — access the workspace profile and manage its editing settings;
For security, it’s highly recommended that you always pick the minimum permission set required for the token.
API tokens are bound to the workspace you’re currently in and visible to other team members. That said, permissions related to personal settings — like User settings and Profile — retrieve details of the user who first created or most recently regenerated the token.
Managing Webhooks
After API tokens, Webhooks are the second most important way of handling content delivery with Vrite. They allow you to create custom actions, reacting to different events, like a content piece being moved to a different group or a new member being added to a workspace. They can be managed in the Webhooks section.
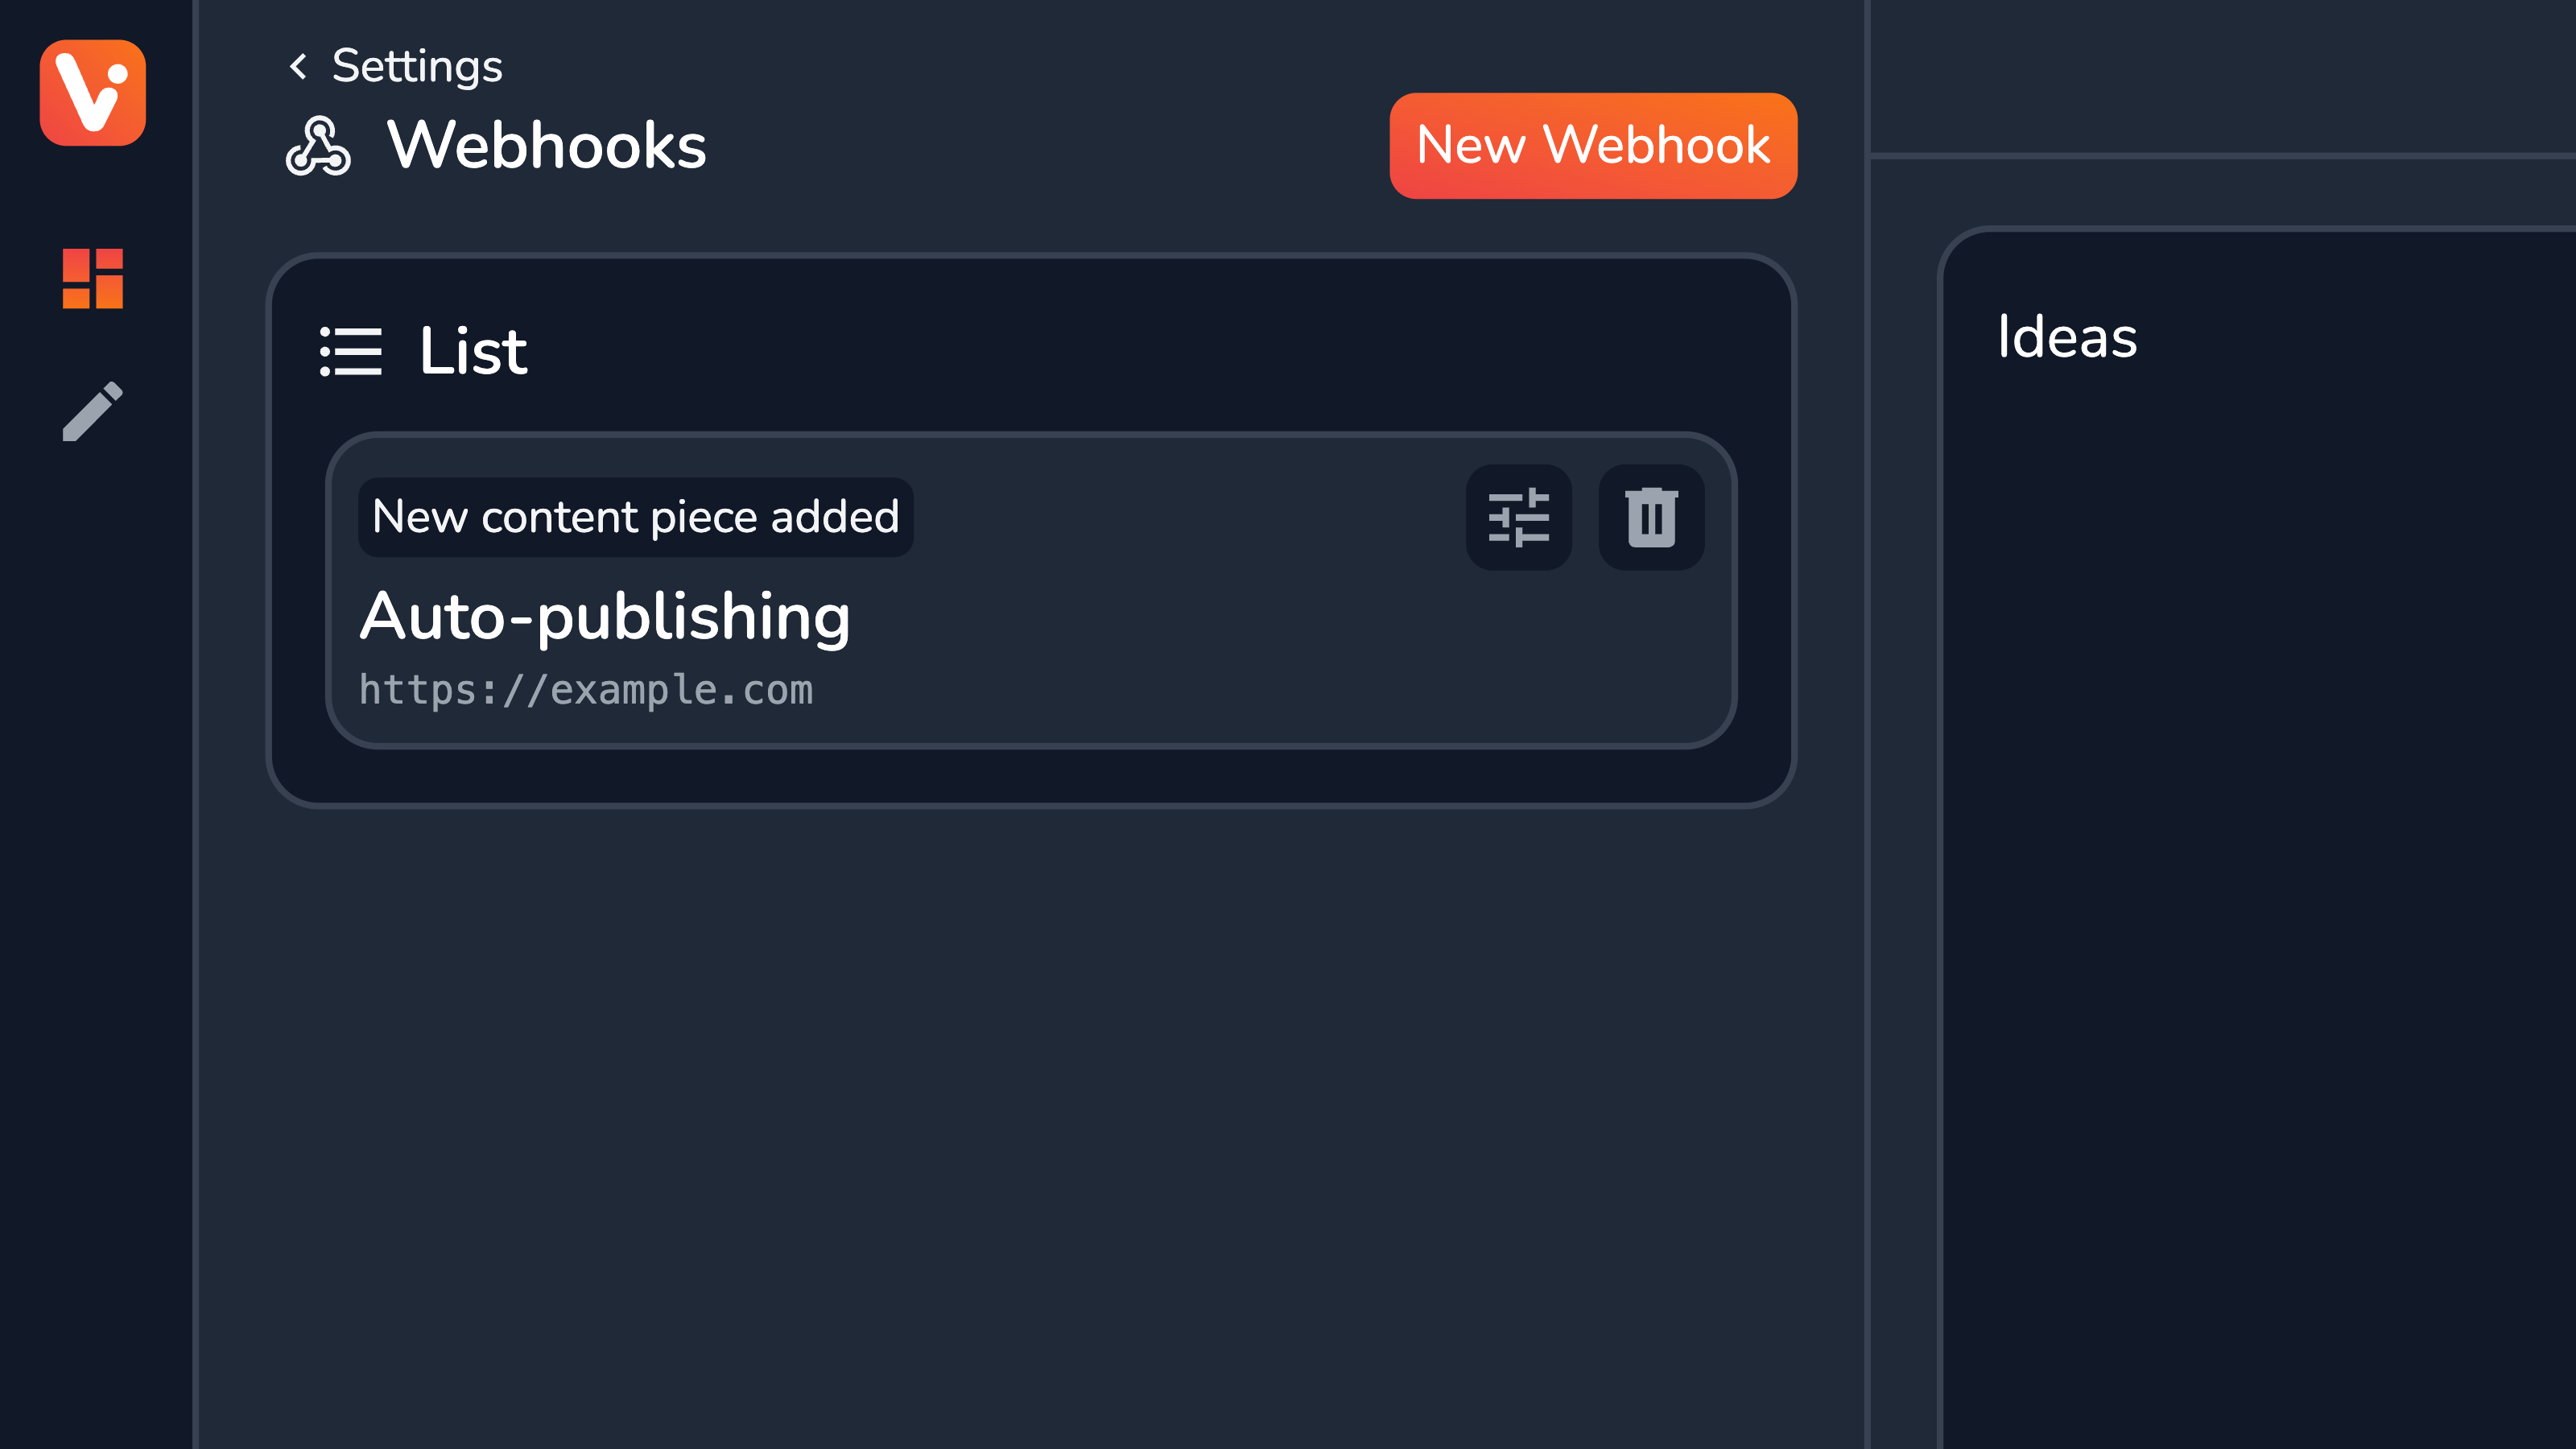
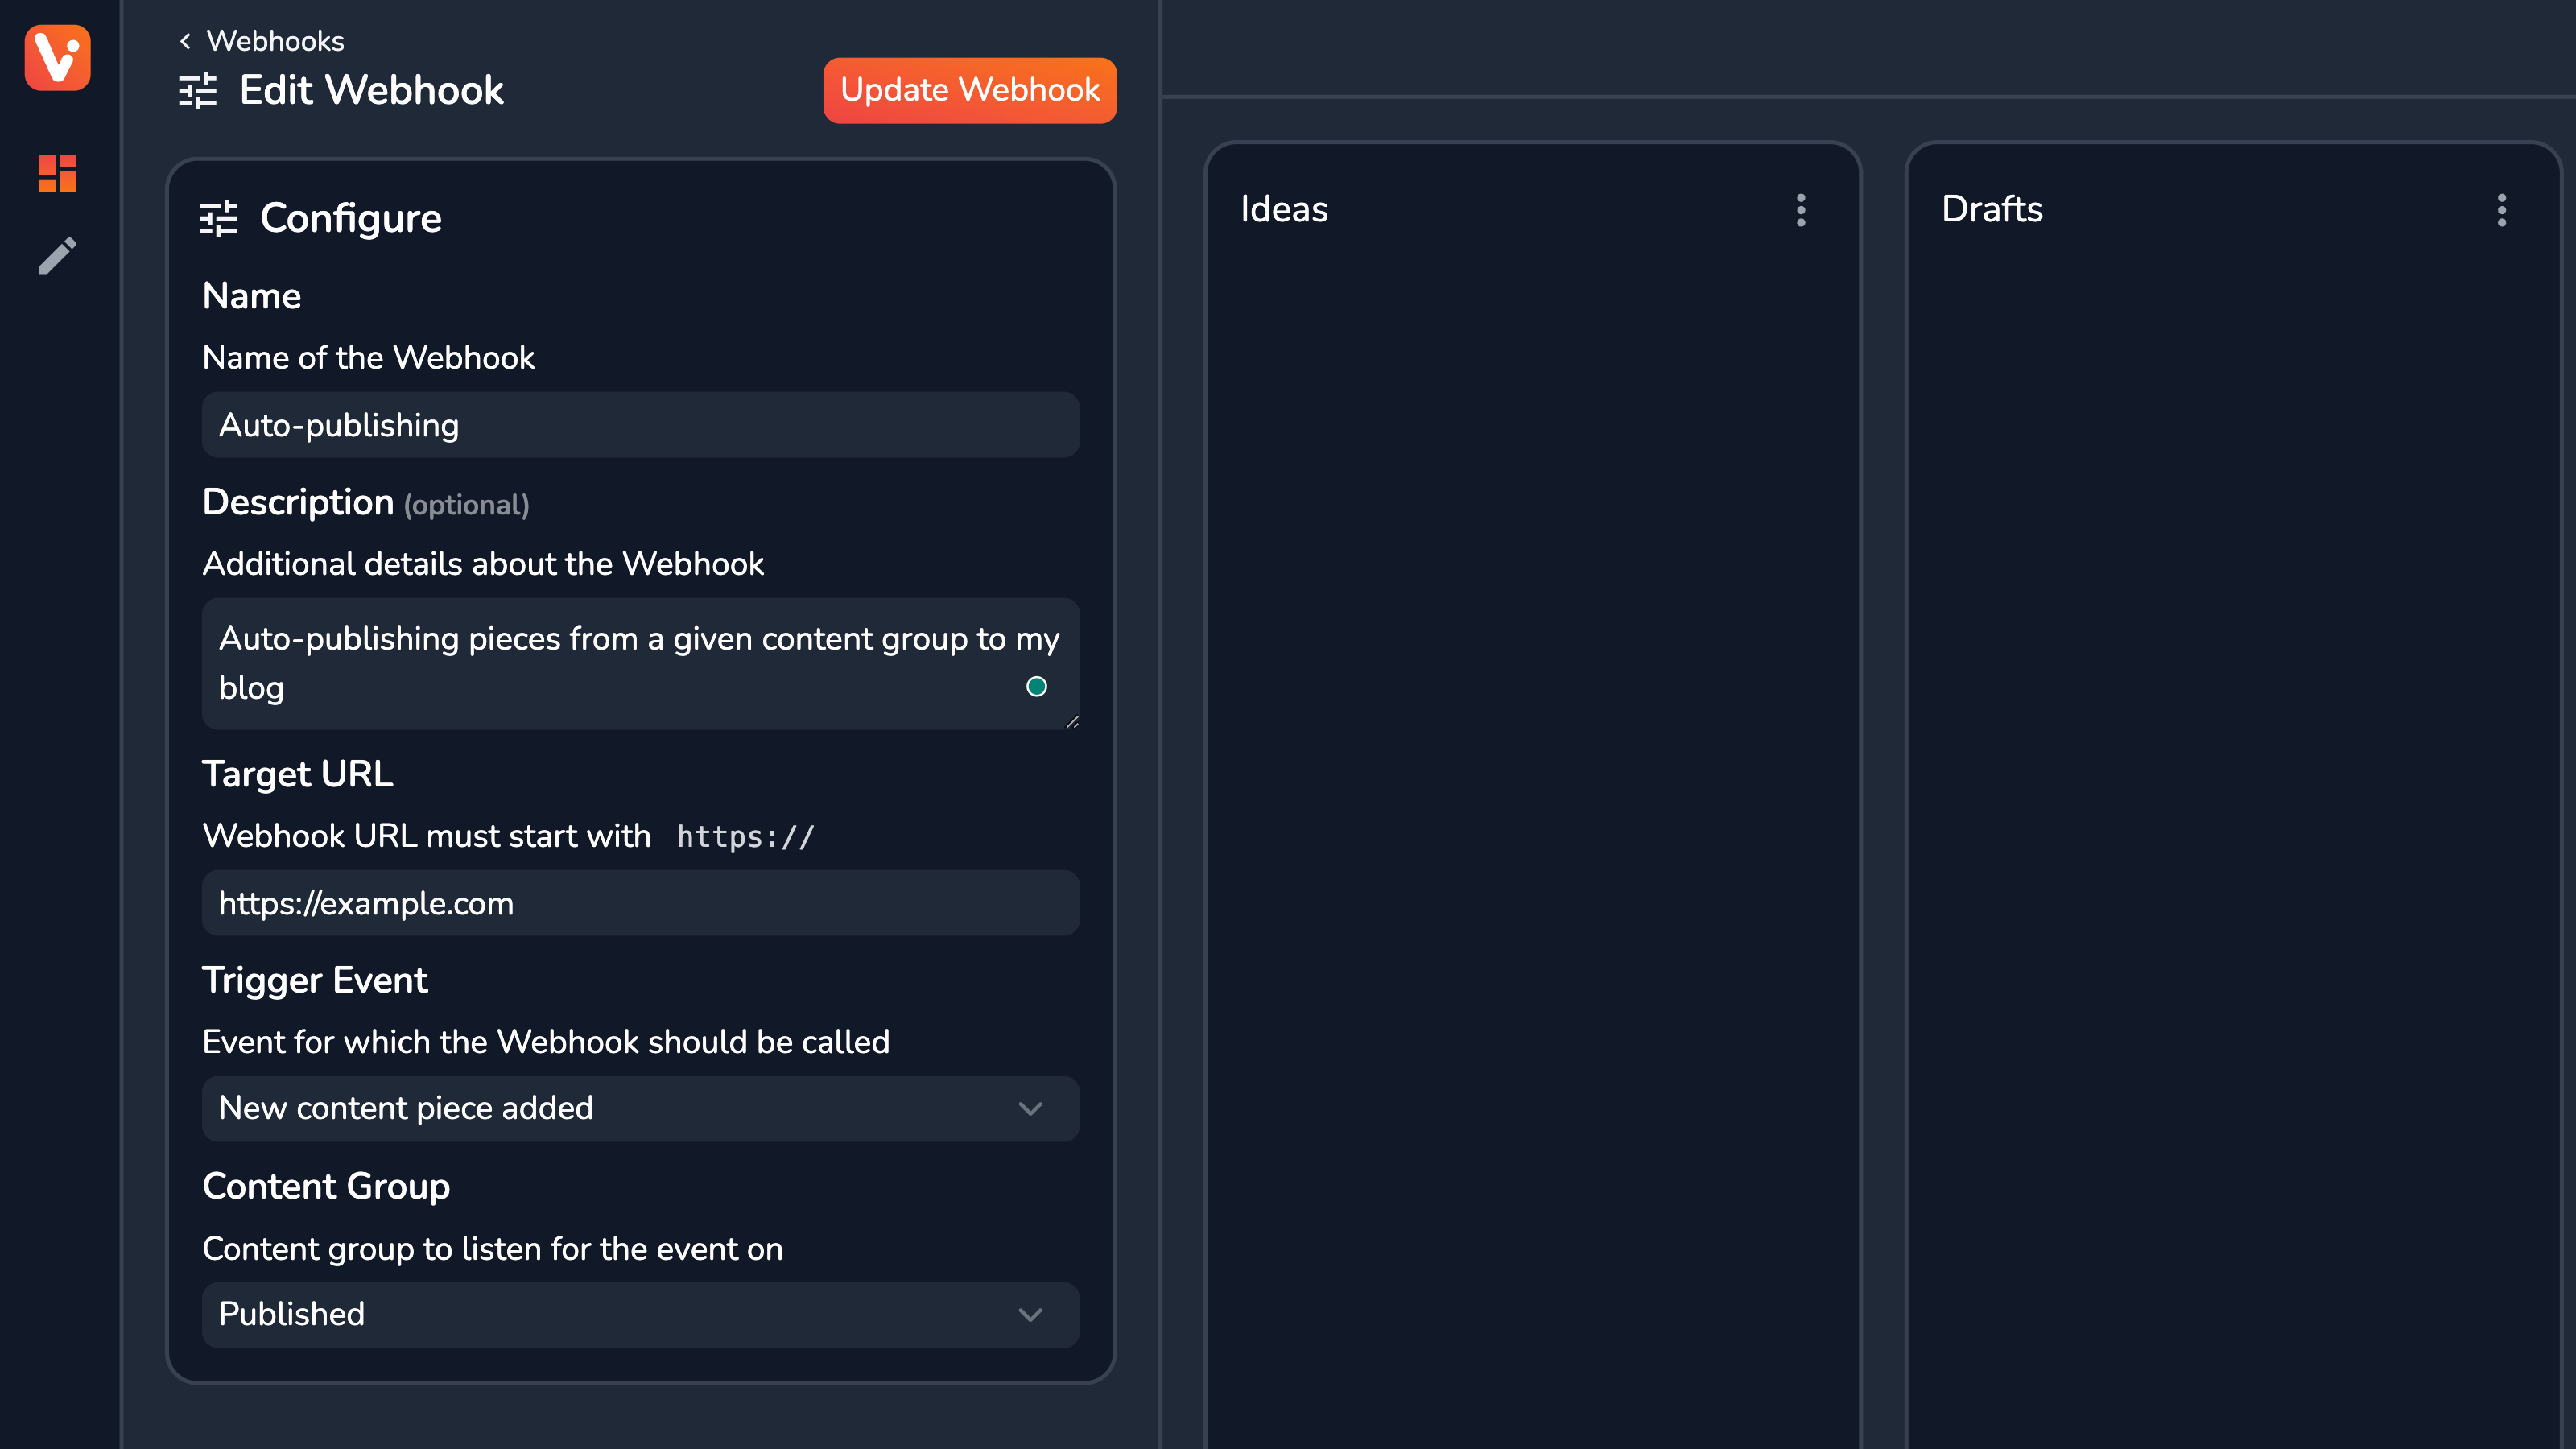
From the main list, you can reconfigure (using the Edit button) or delete (using the Delete button) any available Webhook. You can also create a new one using the New Webhook button in the top-right corner.
Here’s a list of options you can (or have to) configure when creating or updating a Webhook:
- Name — a distinctive name for the Webhook; Required, max 50 characters;
- Description — more details about the Webhook;
- Target URL — URL to send a
POSTrequest to when the given event occurs; Required, must start withhttps://; - Trigger Event — one of the available events the Webhook should be triggered for;
- Content Group — the content group the Webhook event should be triggered for; Only applicable for selected events;
Webhook Events
The available Webhook events are split into 3 groups — for content pieces, content groups, and members.
The content piece events are triggered when a certain event occurs in relation to the content pieces in the selected content group. Available events are:
- New content piece added — a new content piece was created inside or moved into the given content group;
- Content piece updated — the metadata of a content piece in the given content group was updated;
- Content piece removed — a content piece was deleted or moved into a different content group;
Here’s a TypeScript-based interface for the payload that will be received in the body of the POST request for any content piece event:
interface ContentPieceEventPayload {
  id: string;
  date?: string | null;
  title: string;
  description?: string | null;
  tags: string[];
  members: string[];
  coverUrl?: string | null;
  coverAlt?: string | null;
  contentGroupId: string;
  customData?: Record<string, any> | null;
  canonicalLink?: string | null;
  slug: usage-guide/string;
  locked?: boolean;
}
The content group events are triggered when the entire content group is affected. Available events are:
- New content group added — a new content group was created;
- Content group removed — an existing content group was deleted;
The payload interface:
interface ContentGroupEventPayload {
  id: string;
  name: string;
  locked?: boolean;
}
The member events are triggered when workspace memberships are edited. Available events are:
- New member invited — a new member invite was sent;
- _New member added _— an invite was accepted and a member was added to the workspace;
- Member removed — member left or was removed from the workspace;
The payload interface:
interface MemberEventPayload {
  id: string;
  userId?: string; // Available after the invite is accepted
  roleId: string;
  email?: string; // Available until the invite is accepted
  name?: string; // Available until the invite is accepted
}
Configuring Your Profile
When working in a team, or creating your “About me” page, you’ll need some details about your personal profile. In Vrite, these can be configured in the Profile section of the settings.
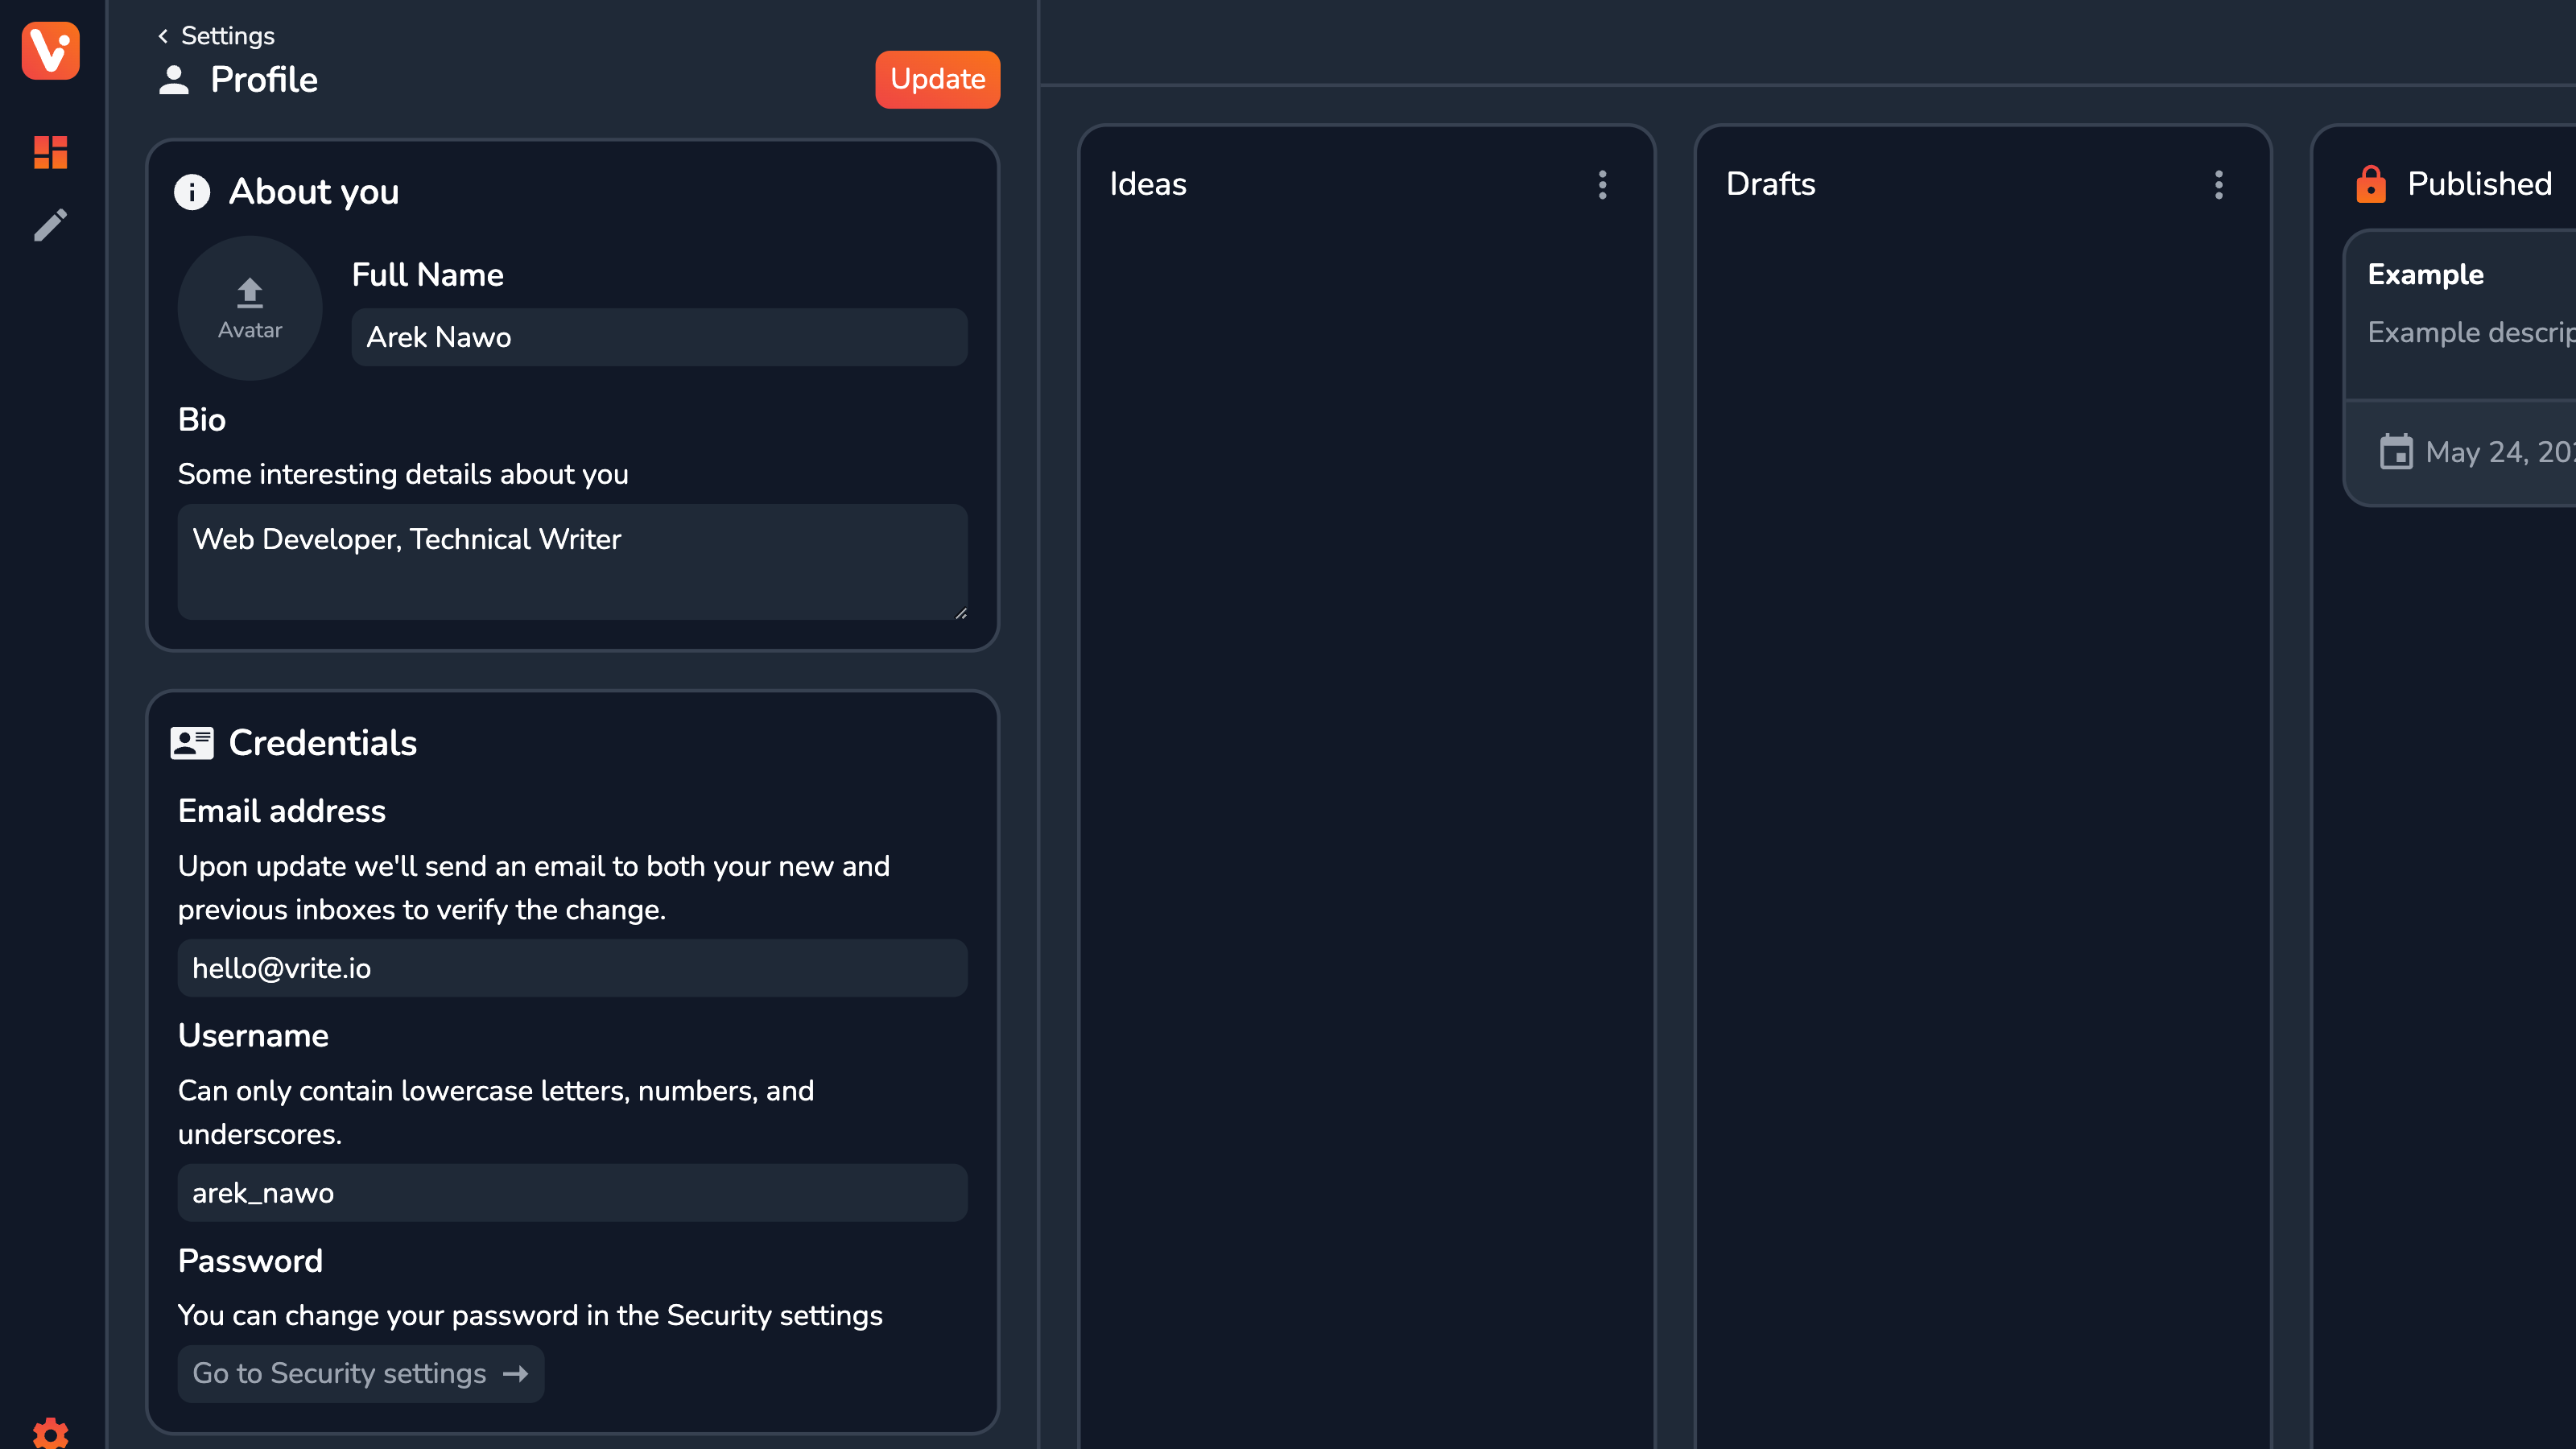
The following profile details can be customized:
- Avatar — your personal avatar; Visible in the dashboard and editor when collaborating in real-time;
- Full Name — your (preferably real) full name; Used across Vrite in place or in addition to your username; It has 50 character limit;
- Bio — additional details about you that can be retrieved through the API;
On top of the profile details you can also update your Vrite credentials, including:
- Email address — used for various communications (like password changes or magic links) and log in; Changing it will require confirmation via an email link, from both your previous and newly-changed email; Before that happens the change is not applied;
- Username — a required, short, recognizable name for use across Vrite; It can only contain lowercase letters, numbers, and underscores and has 20 character limit;
- Password — can be changed in the separate Security section of the settings;
When you’re finished with your changes, click Update in the top-right corner to save them.
Customizing UI Appearance
If you want to personalize the Vrite UI a bit, you can do so in the Appearance section. Here you can pick your main UI theme and Code editor theme as one of Dark, Light or Auto (dependent on the system settings).
You can also pick from one of six available Accent colors — to customize important UI elements.
You’ll see the changes applied immediately so that you can visually pick your preferred configuration.

Changing the Password
The security of your password is very important, as it guards access to your entire Vrite account. In case you forget it or learn that it was leaked, you can always change it in the Security section.
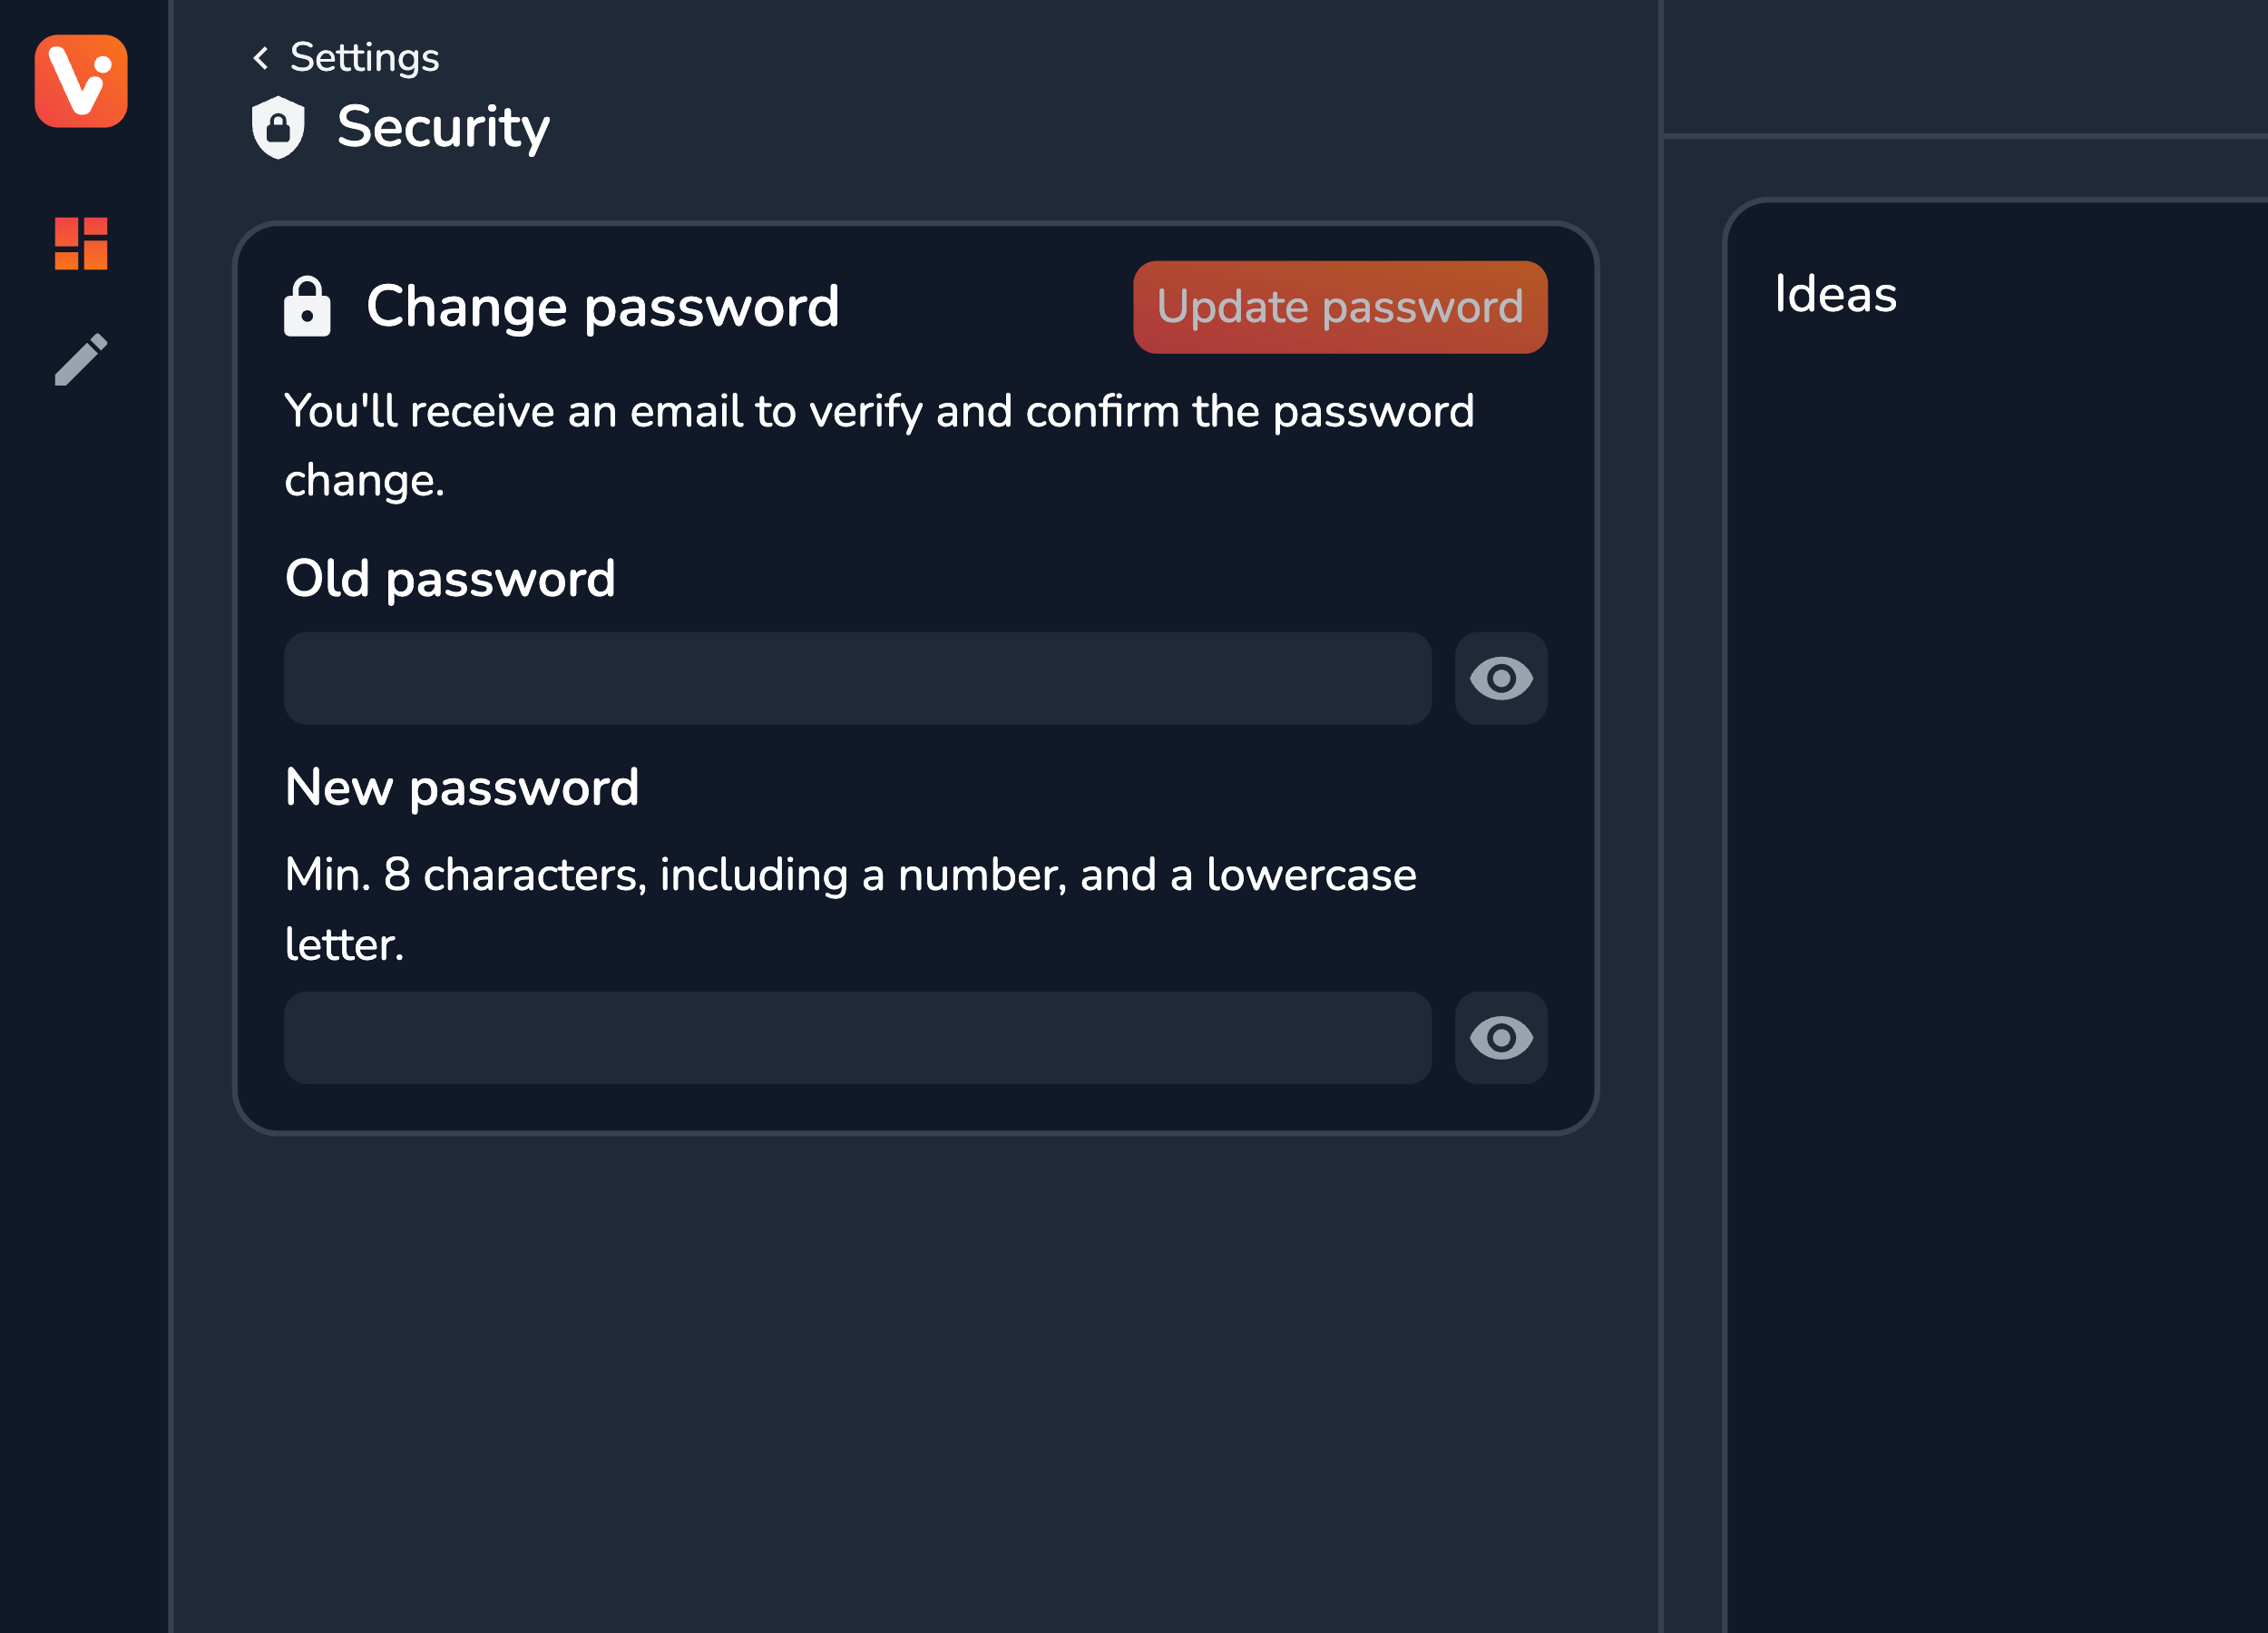
To change the password provide both your current and new password and submit with the Update password button. Before the change takes effect, you’ll have to confirm it using a verification link sent to your email address.
Managing Workspace
The Workspace section to the go-to place for managing your team. Here you can customize basic details about the Workspace, invite new members, and configure their permissions in the Workspace.
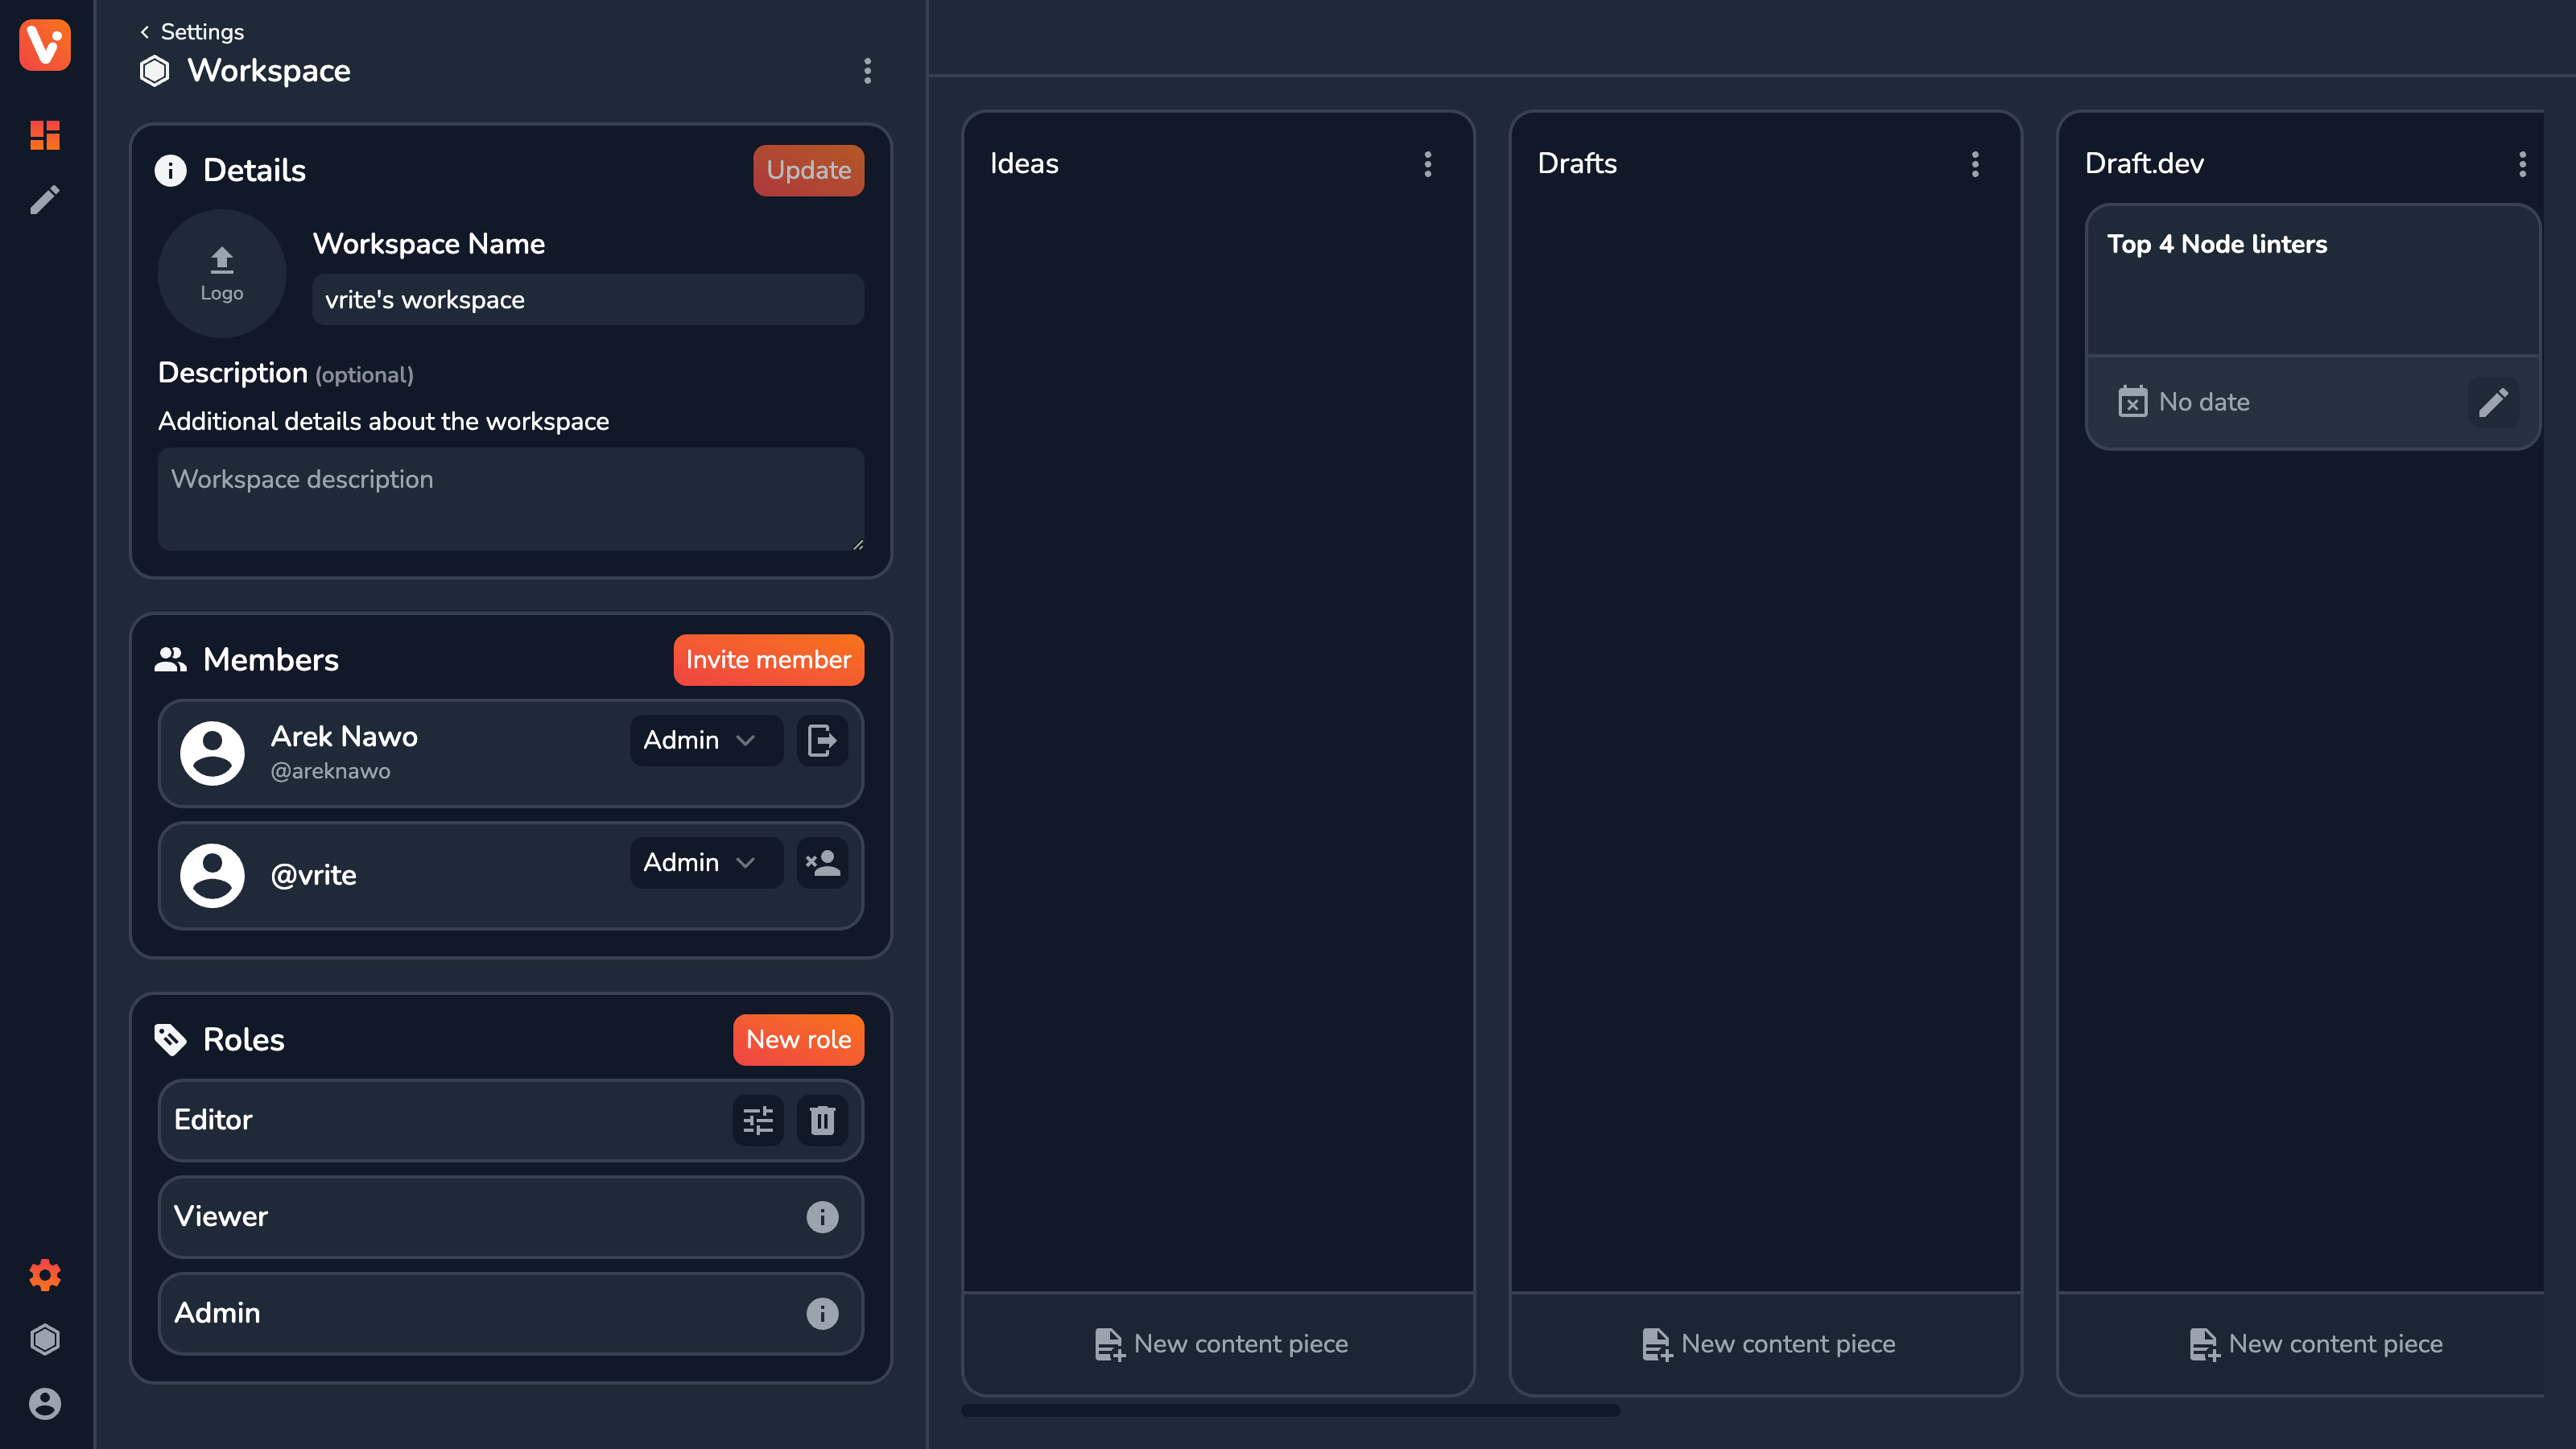
At the very top, you can configure Workspace details including:
- Logo — custom logo image for the Workspace;
- Workspace Name — the name of the Workspace;
- Description — additional details about the Workspace;
When you’re finished editing, save the details using the Update button in the top-right corner.
In case you want to delete the entire Workspace (a very dangerous action) use the Delete button from the side panel’s top-right dropdown menu.
Managing Roles
Under Roles, you can see a list of all the roles available in the Workspace. Two roles are created by default and cannot be edited:
- Viewer — role with no permissions; Can only preview the information in the Workspace;
- Admin — role with all permissions; Assigned by default to the one who originally created the Workspace; At all times, there has to be at least one Admin in the Workspace;
All other roles listed can be edited (by clicking the Edit button) or deleted (by clicking the Delete button). You can also create new roles by clicking New role in the top-right corner.
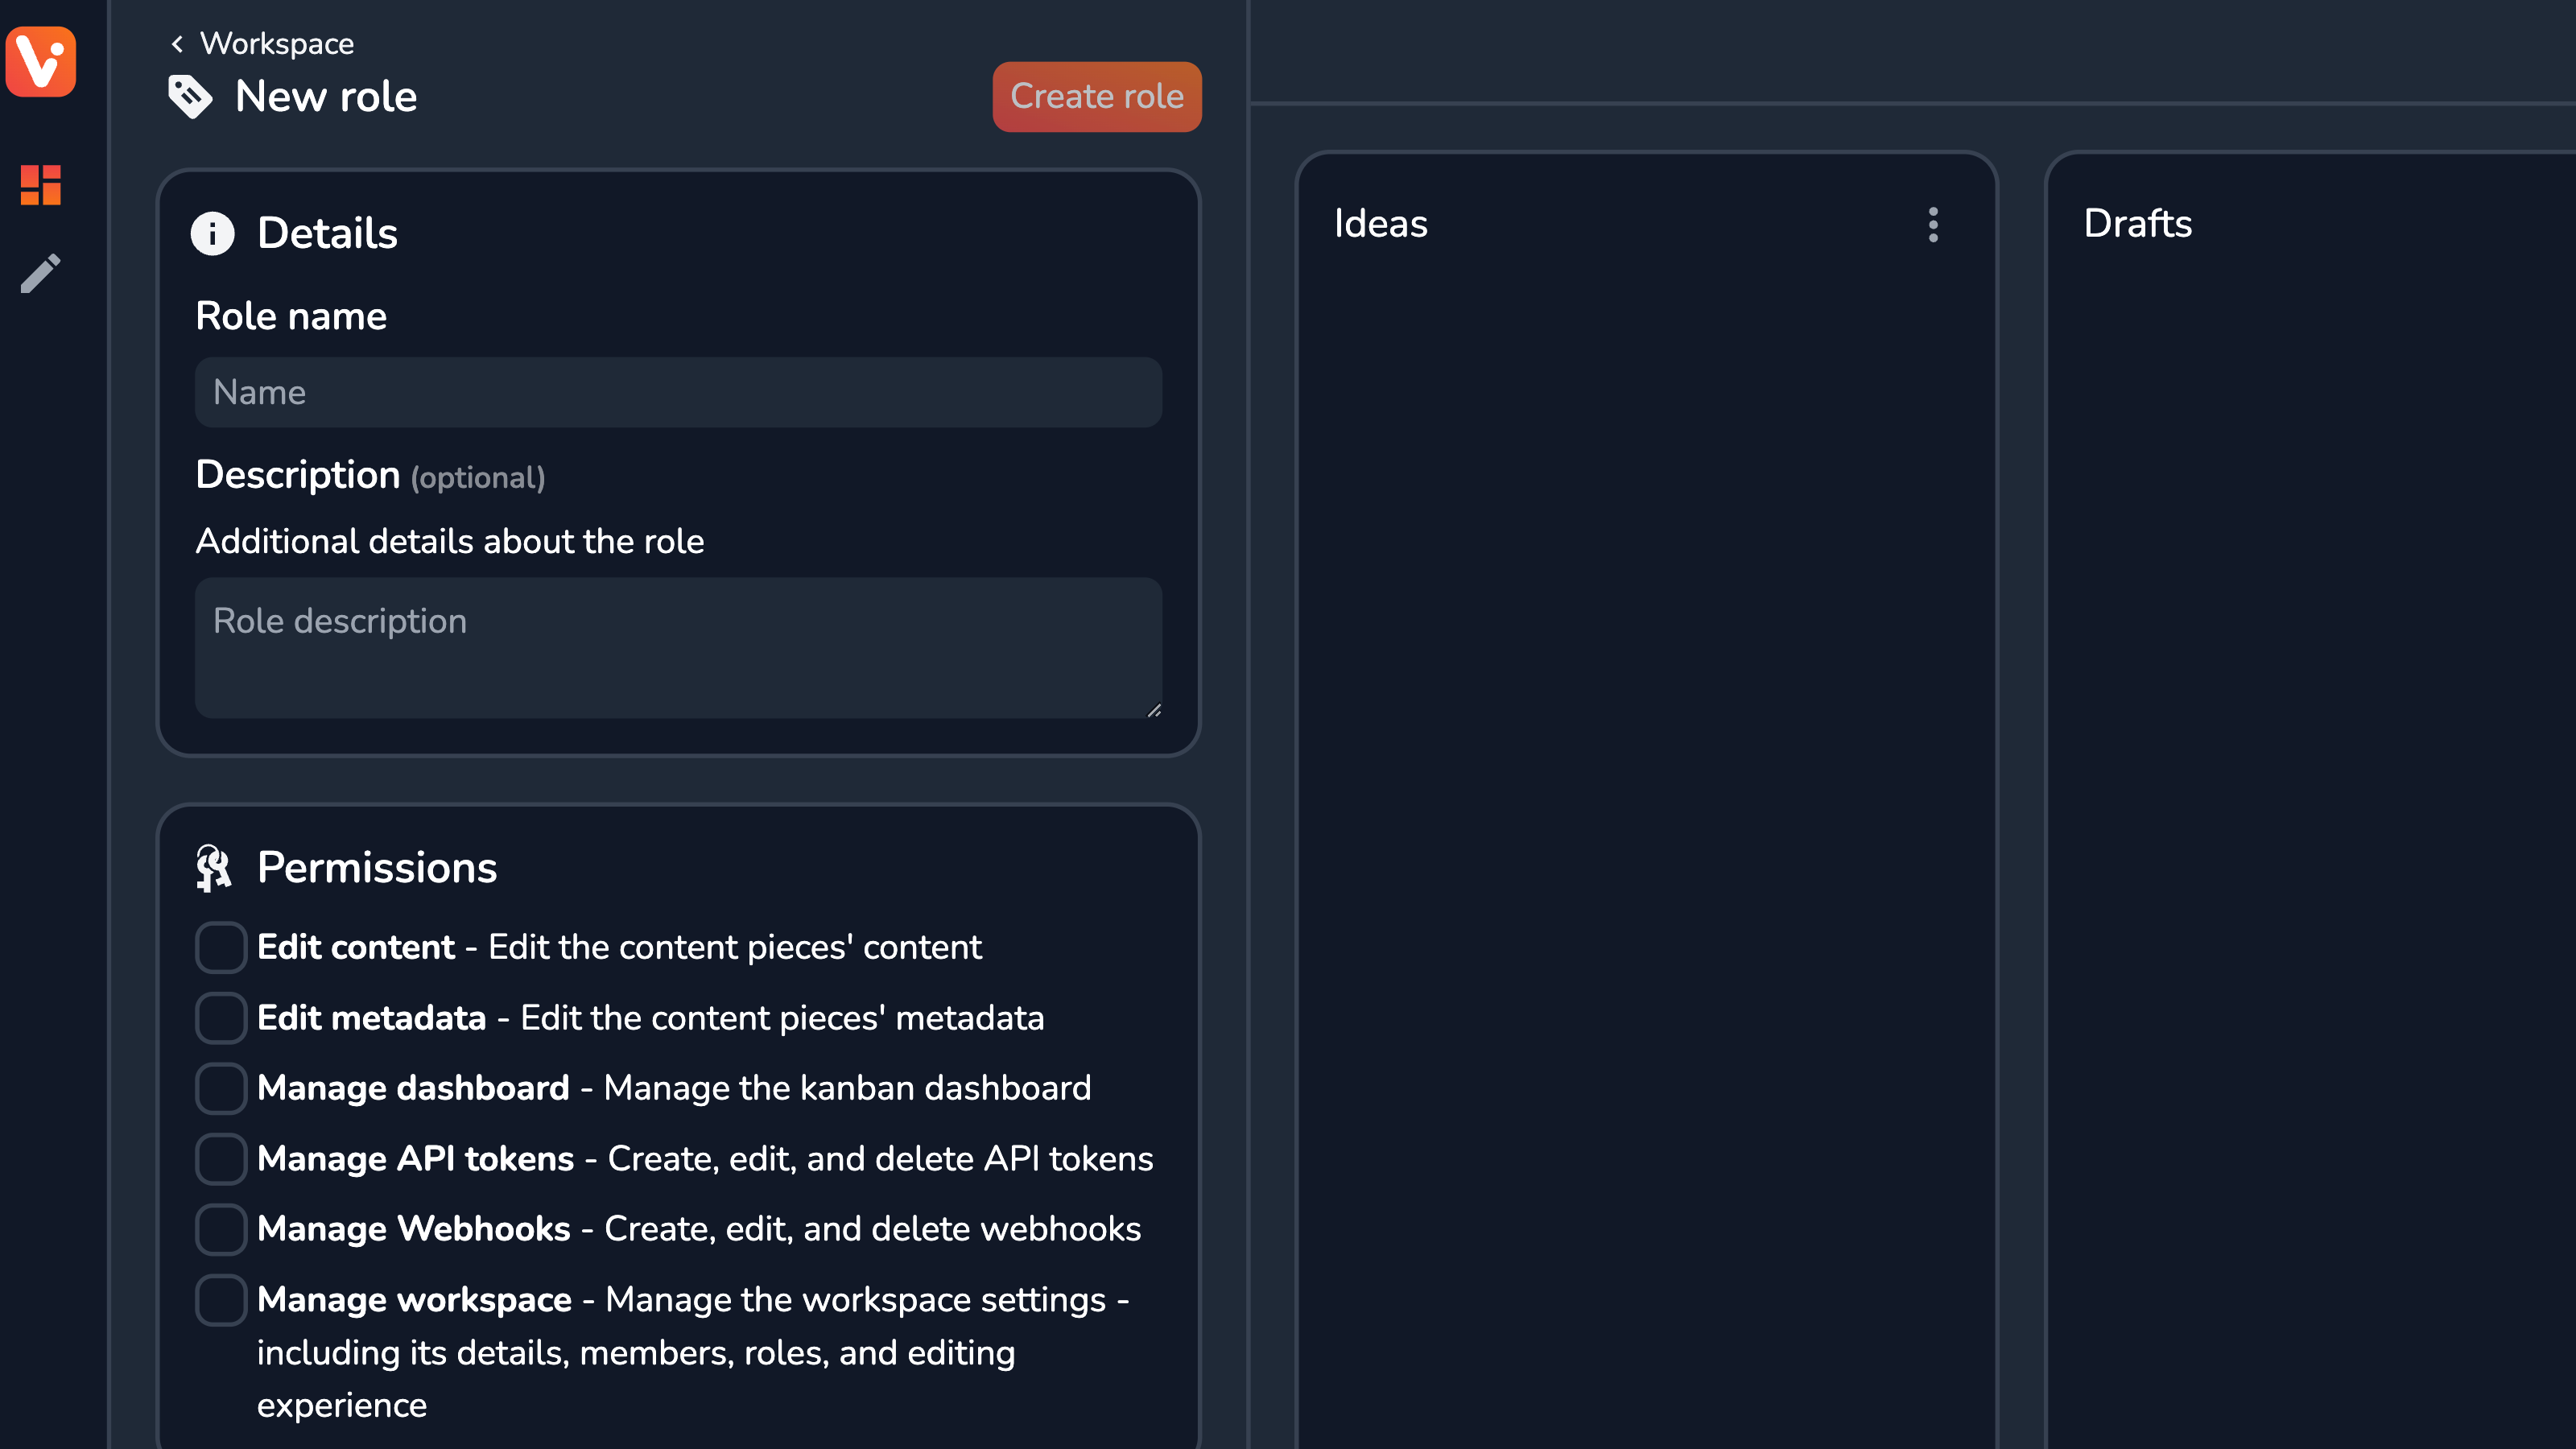
When configuring a role, you have to provide a Role name and an optional description of the role. Apart from that, you need to configure the role’s permissions.
The assigned permissions determine what actions will the user who’s been assigned the role be able to take. The available permissions are:
- Edit content — for editing content pieces’ content in the editor;
- Edit metadata — for editing content pieces’ metadata in the metadata side panel;
- Manage dashboard — for creating, moving, and deleting content pieces in the dashboard;
- Manage API tokens — for creating, editing, deleting, and regenerating API tokens in the API section of the settings;
- Manage Webhooks — for creating, editing, and deleting Webhooks in the Webhooks section of the settings;
- Manage Workspace — the most powerful permission; Allows for managing roles, members, and the editing experience in the Workspace; The user with this permission can change his own role further and even delete the entire Workspace;
It’s recommended to assign the minimum required set of permissions to any given role.
Managing Members
Under Members, you can see a list of all the members in the Workspace, along with their names, full names (if available), and assigned roles.
Having the necessary permissions, you can change a member’s role to any one of the available (by using the select menu) or remove him entirely (using the Remove button). You can also leave the Workspace yourself (using the Leave button).
To add new members to a Workspace you have to invite them first (by clicking Invite member).

To send an invite, you’ll have to provide:
- Name — how to refer to the potential new member in an invite; When the invite is accepted, this name will be replaced by the user’s actual username or full name (if available);
- Email address — where to send the invite to; If this user doesn’t have a Vrite account already, he’ll be prompted to sign up to accept the invite right after;
- Role — the default role to assign to the member; If you don’t fully trust the email you’re sending the invite to, it’s recommended to set the default role to just Viewer;
When the form is filled out, click Send invite to actually mail the invite. The new member will have up to 30 days to accept the invite before it expires.
Customizing the Editing Experience
Vrite editor provides various formatting options and content blocks. However, when you’re writing primarily for a platform or frontend that doesn’t support all the options that Vrite does, or you’re leading a team and want to prevent the use of certain formatting, you’ll likely want to customize the available option set. You can do so in the Editing experience section.
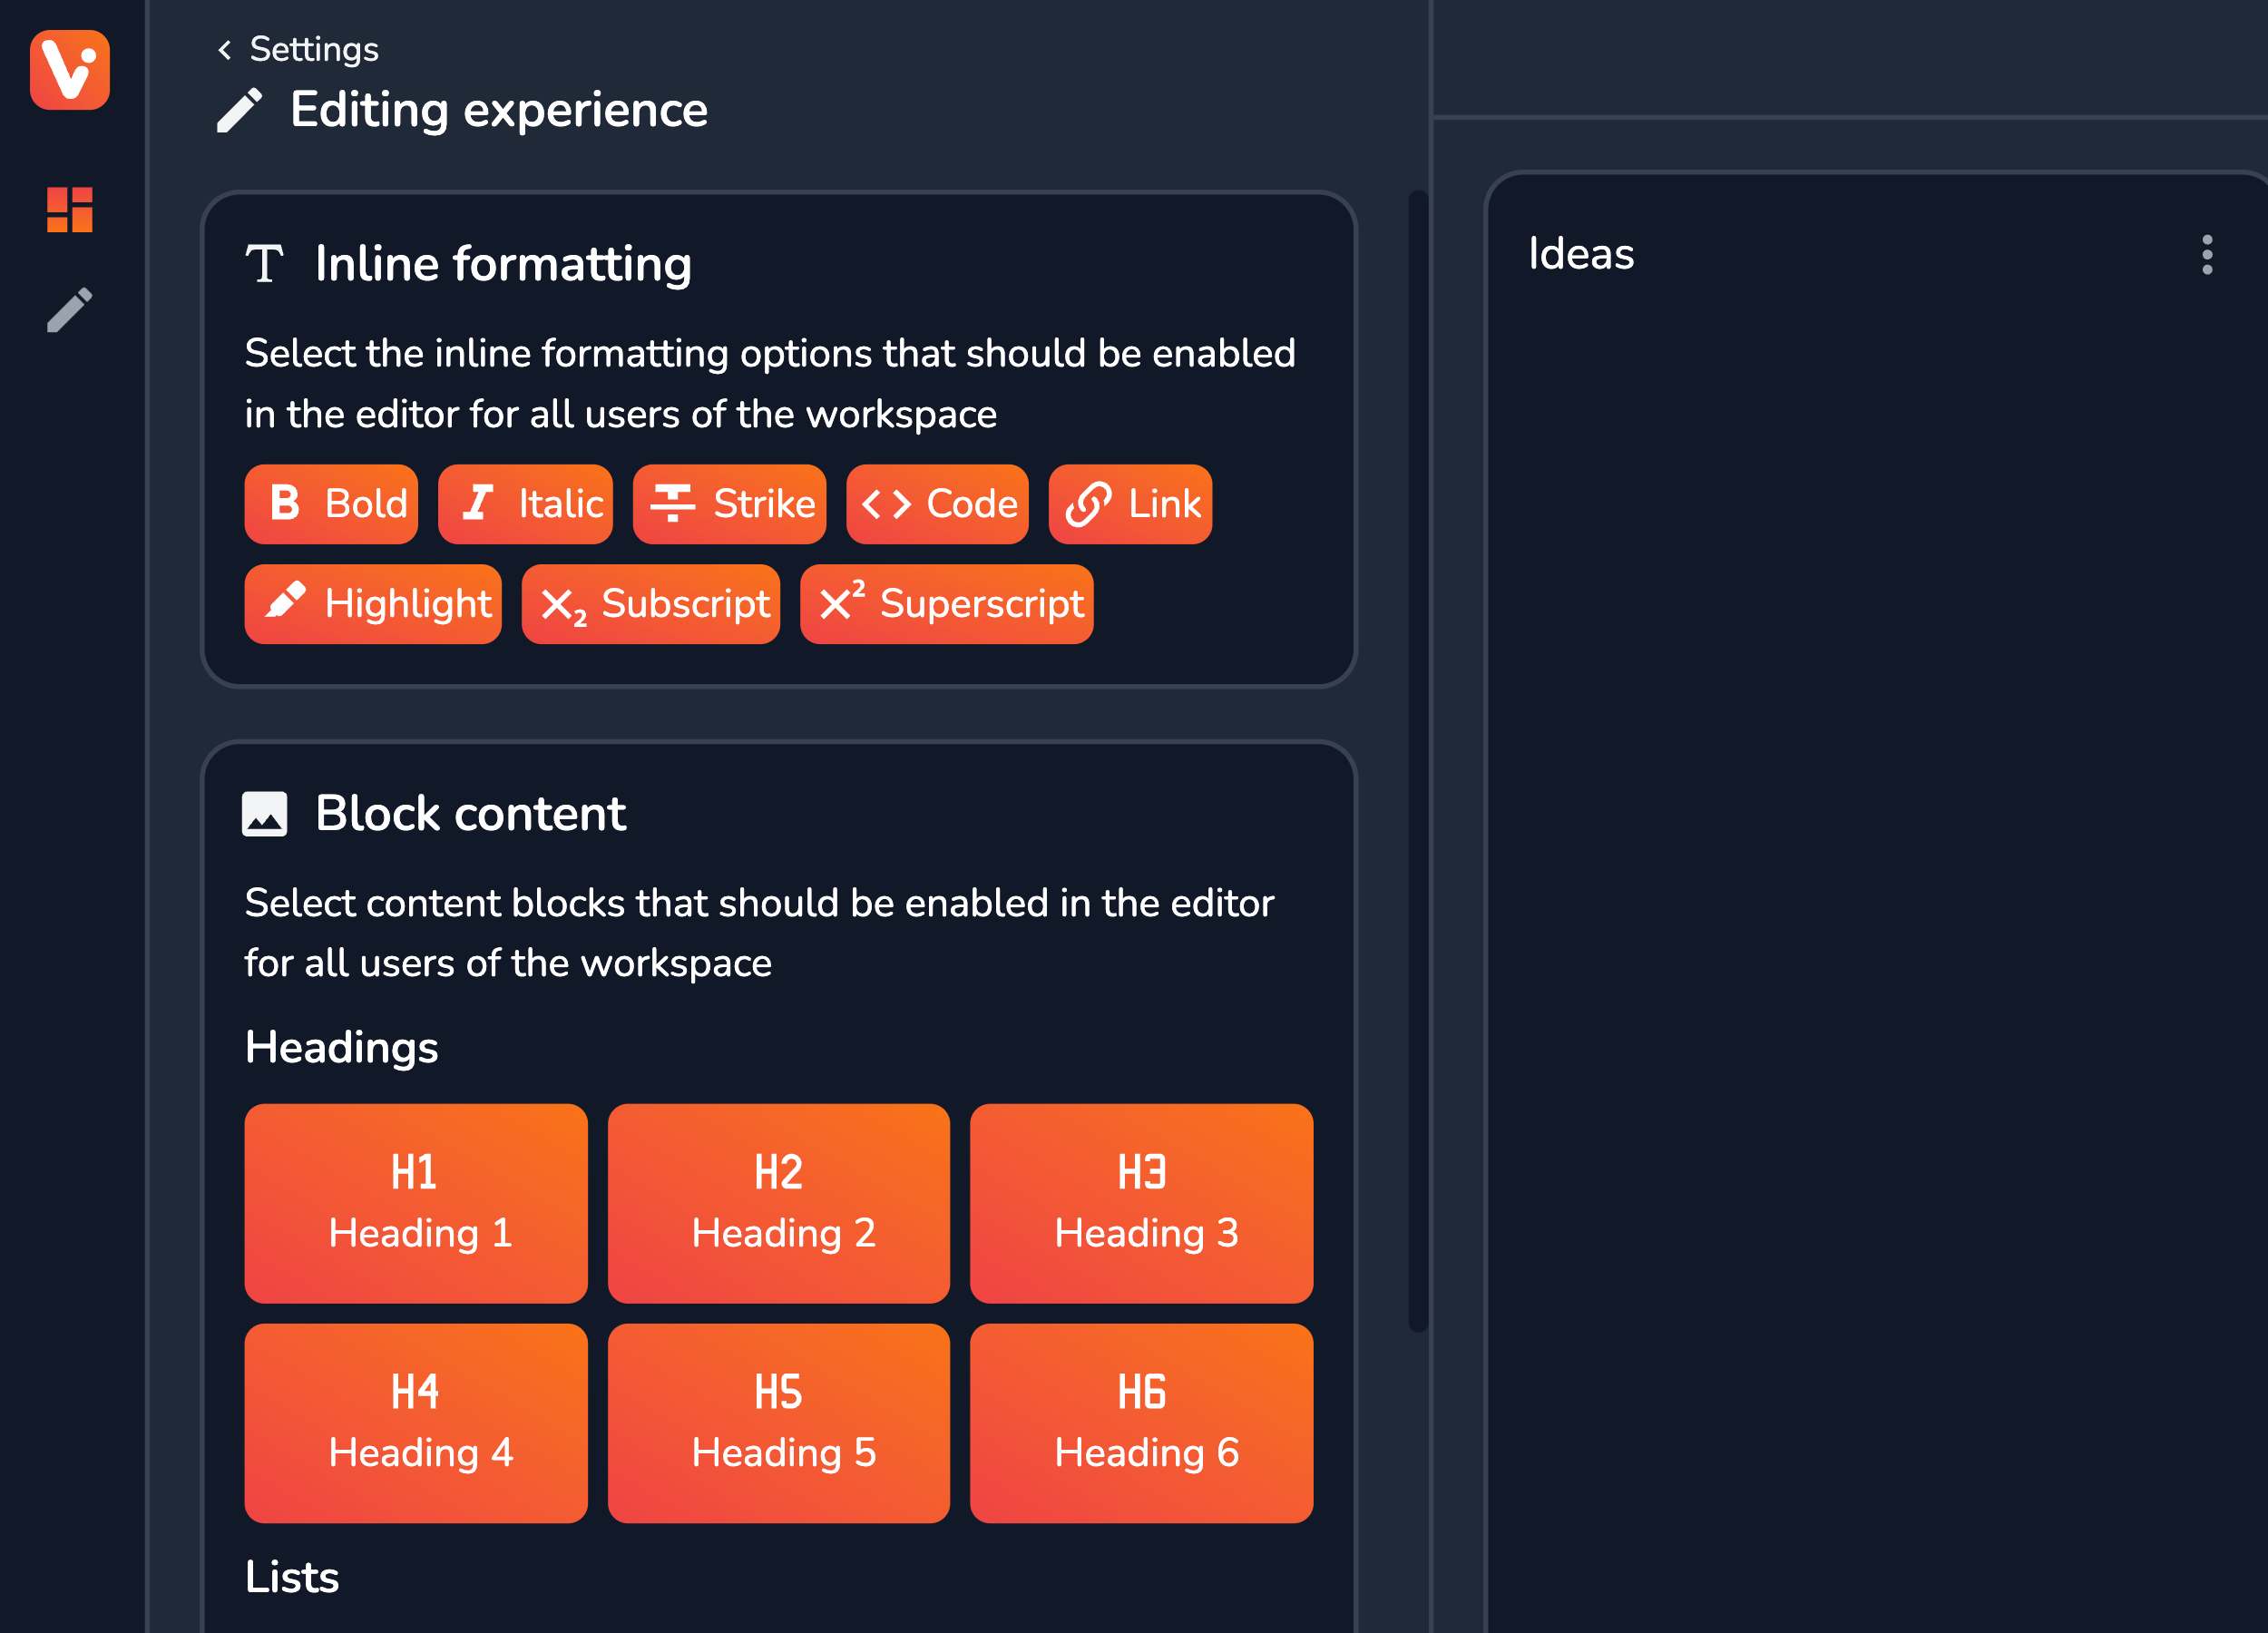
Simply click to switch various formatting options and content blocks on and off. When an option is turned off, the existing content that used it will remain as-is. However, using it again, in any way — including the editing menus, shortcuts, or copy-paste — will be disabled.
Prettier Configuration
In addition to the formatting options available, you might want to enforce a certain coding style in the code snippets. For supported languages, you can do so by configuring the built-in Prettier code formatter integration.
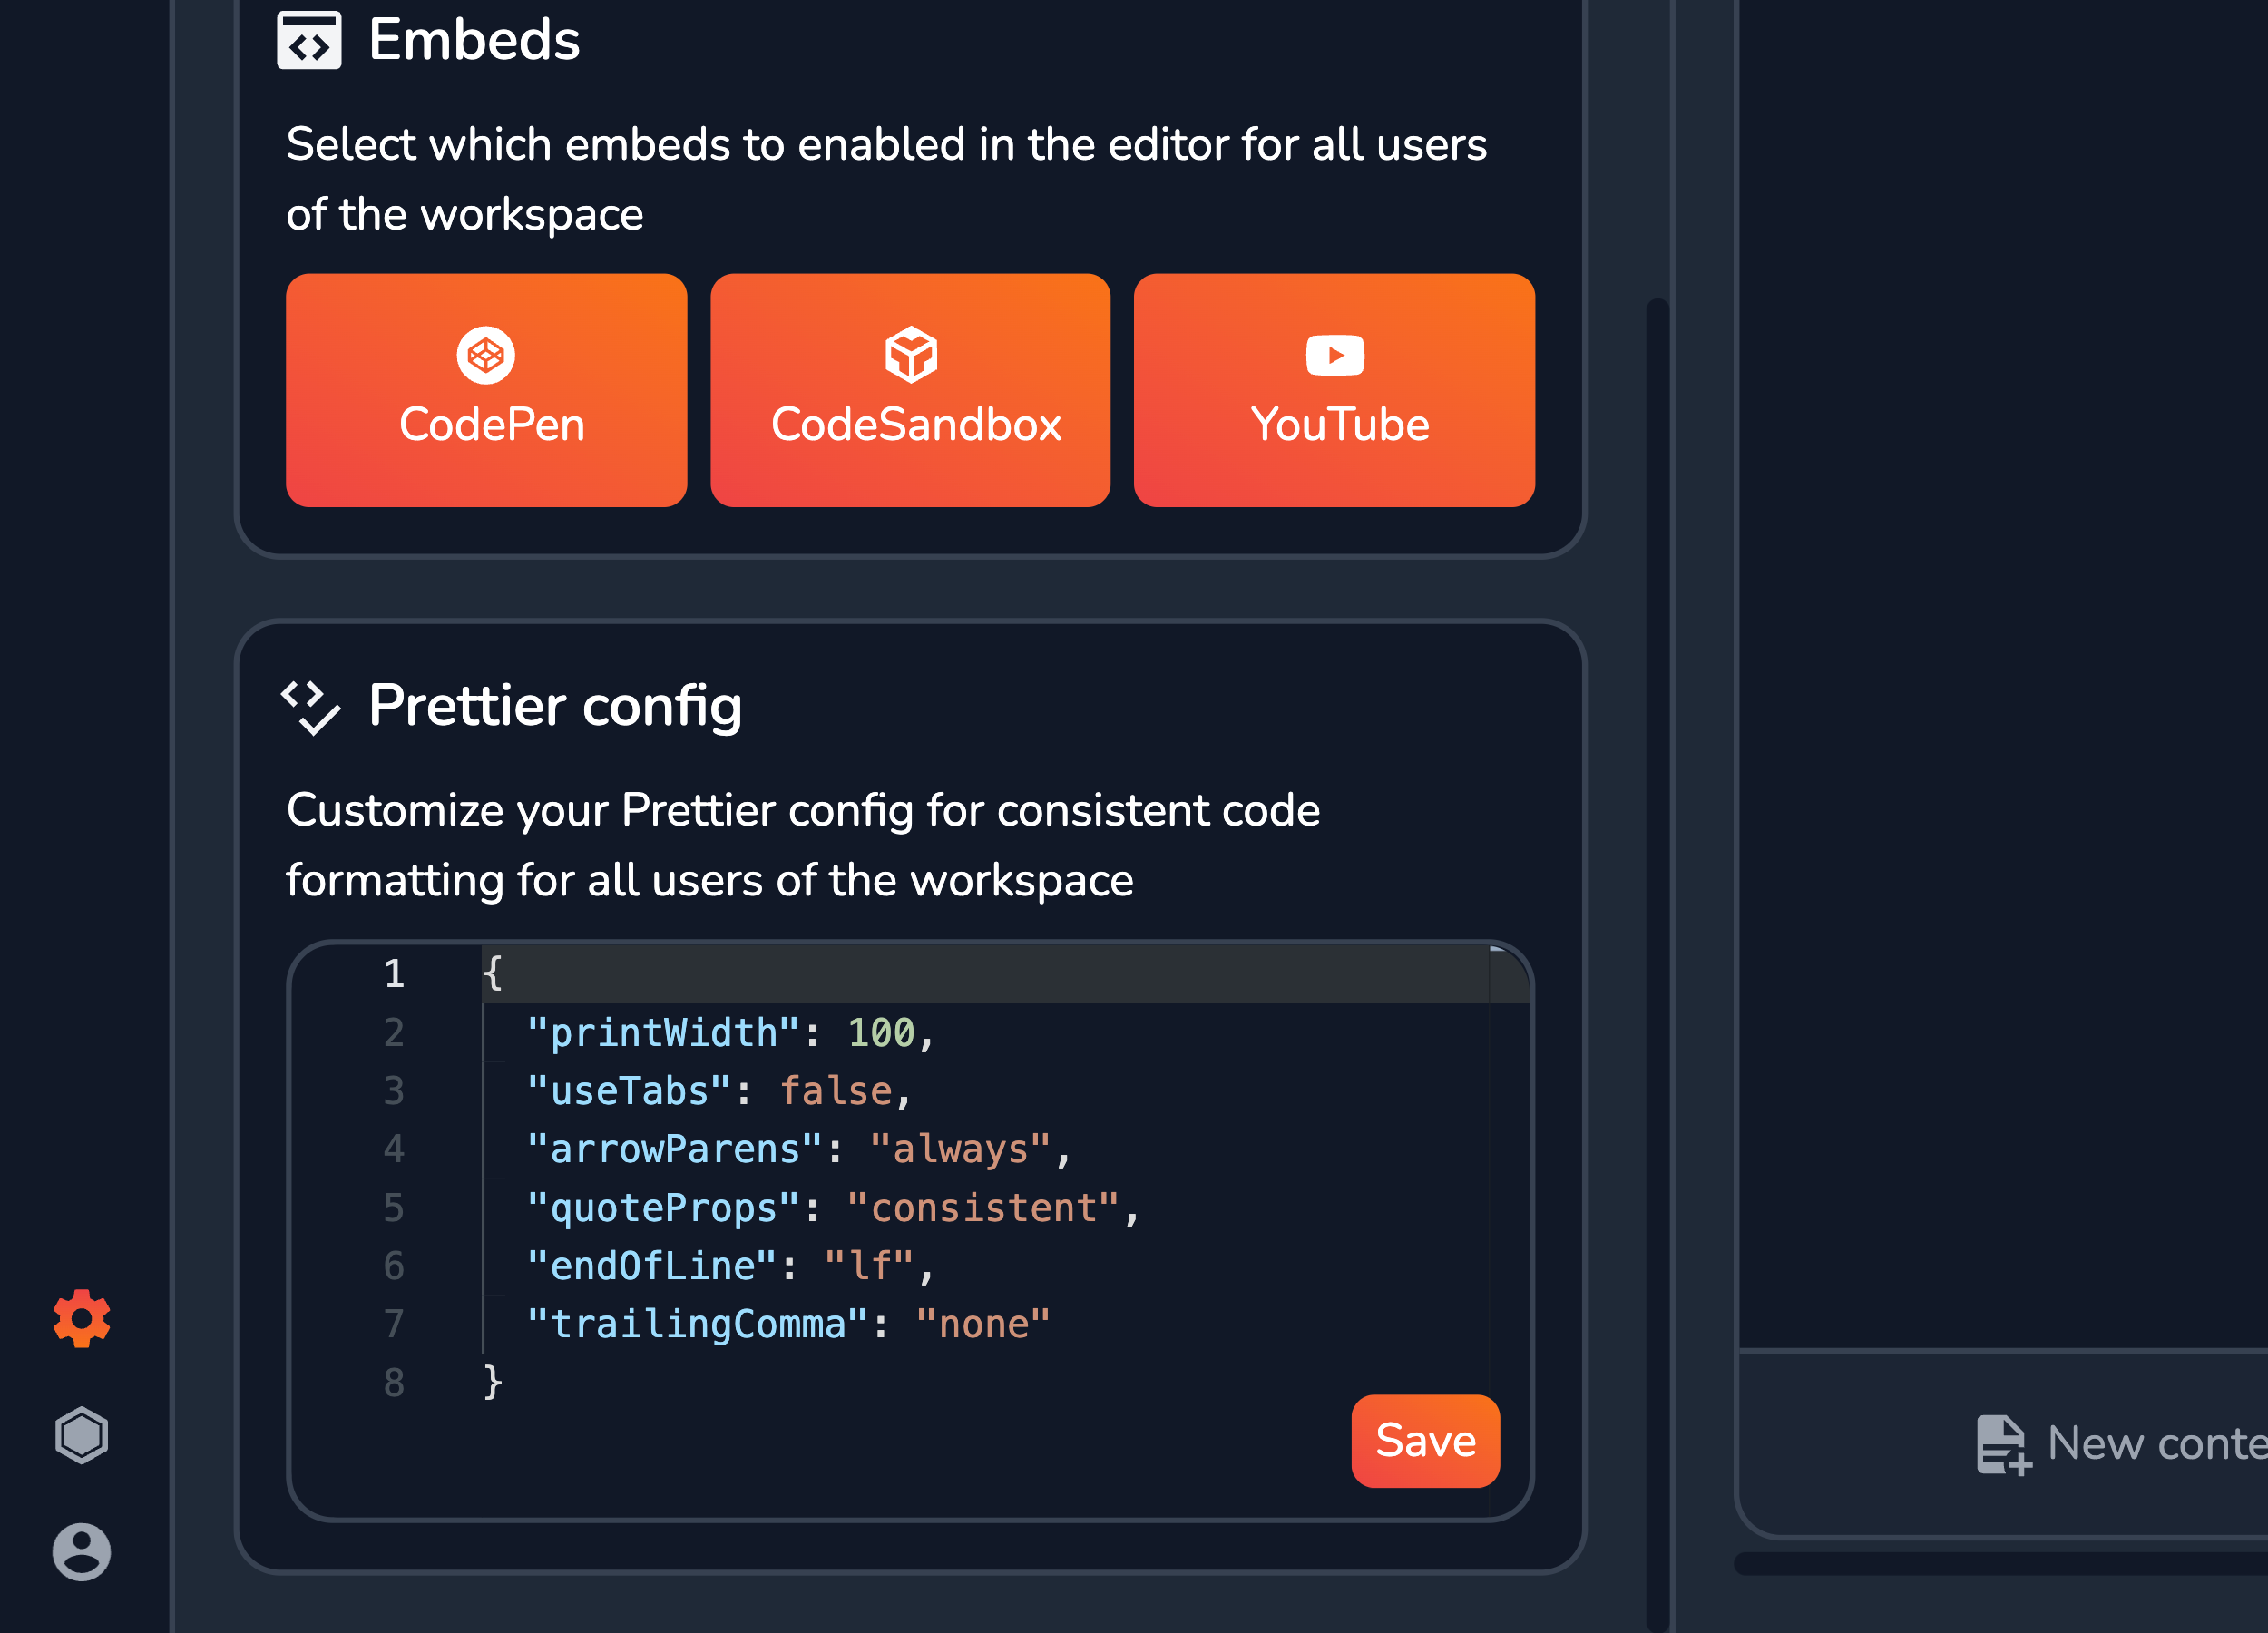
At the bottom of the same section, you can provide your Prettier configuration in a JSON format. Vrite supports most of the available Prettier options, providing autocompletion for them in the editor, and signaling any mistakes in the configuration.
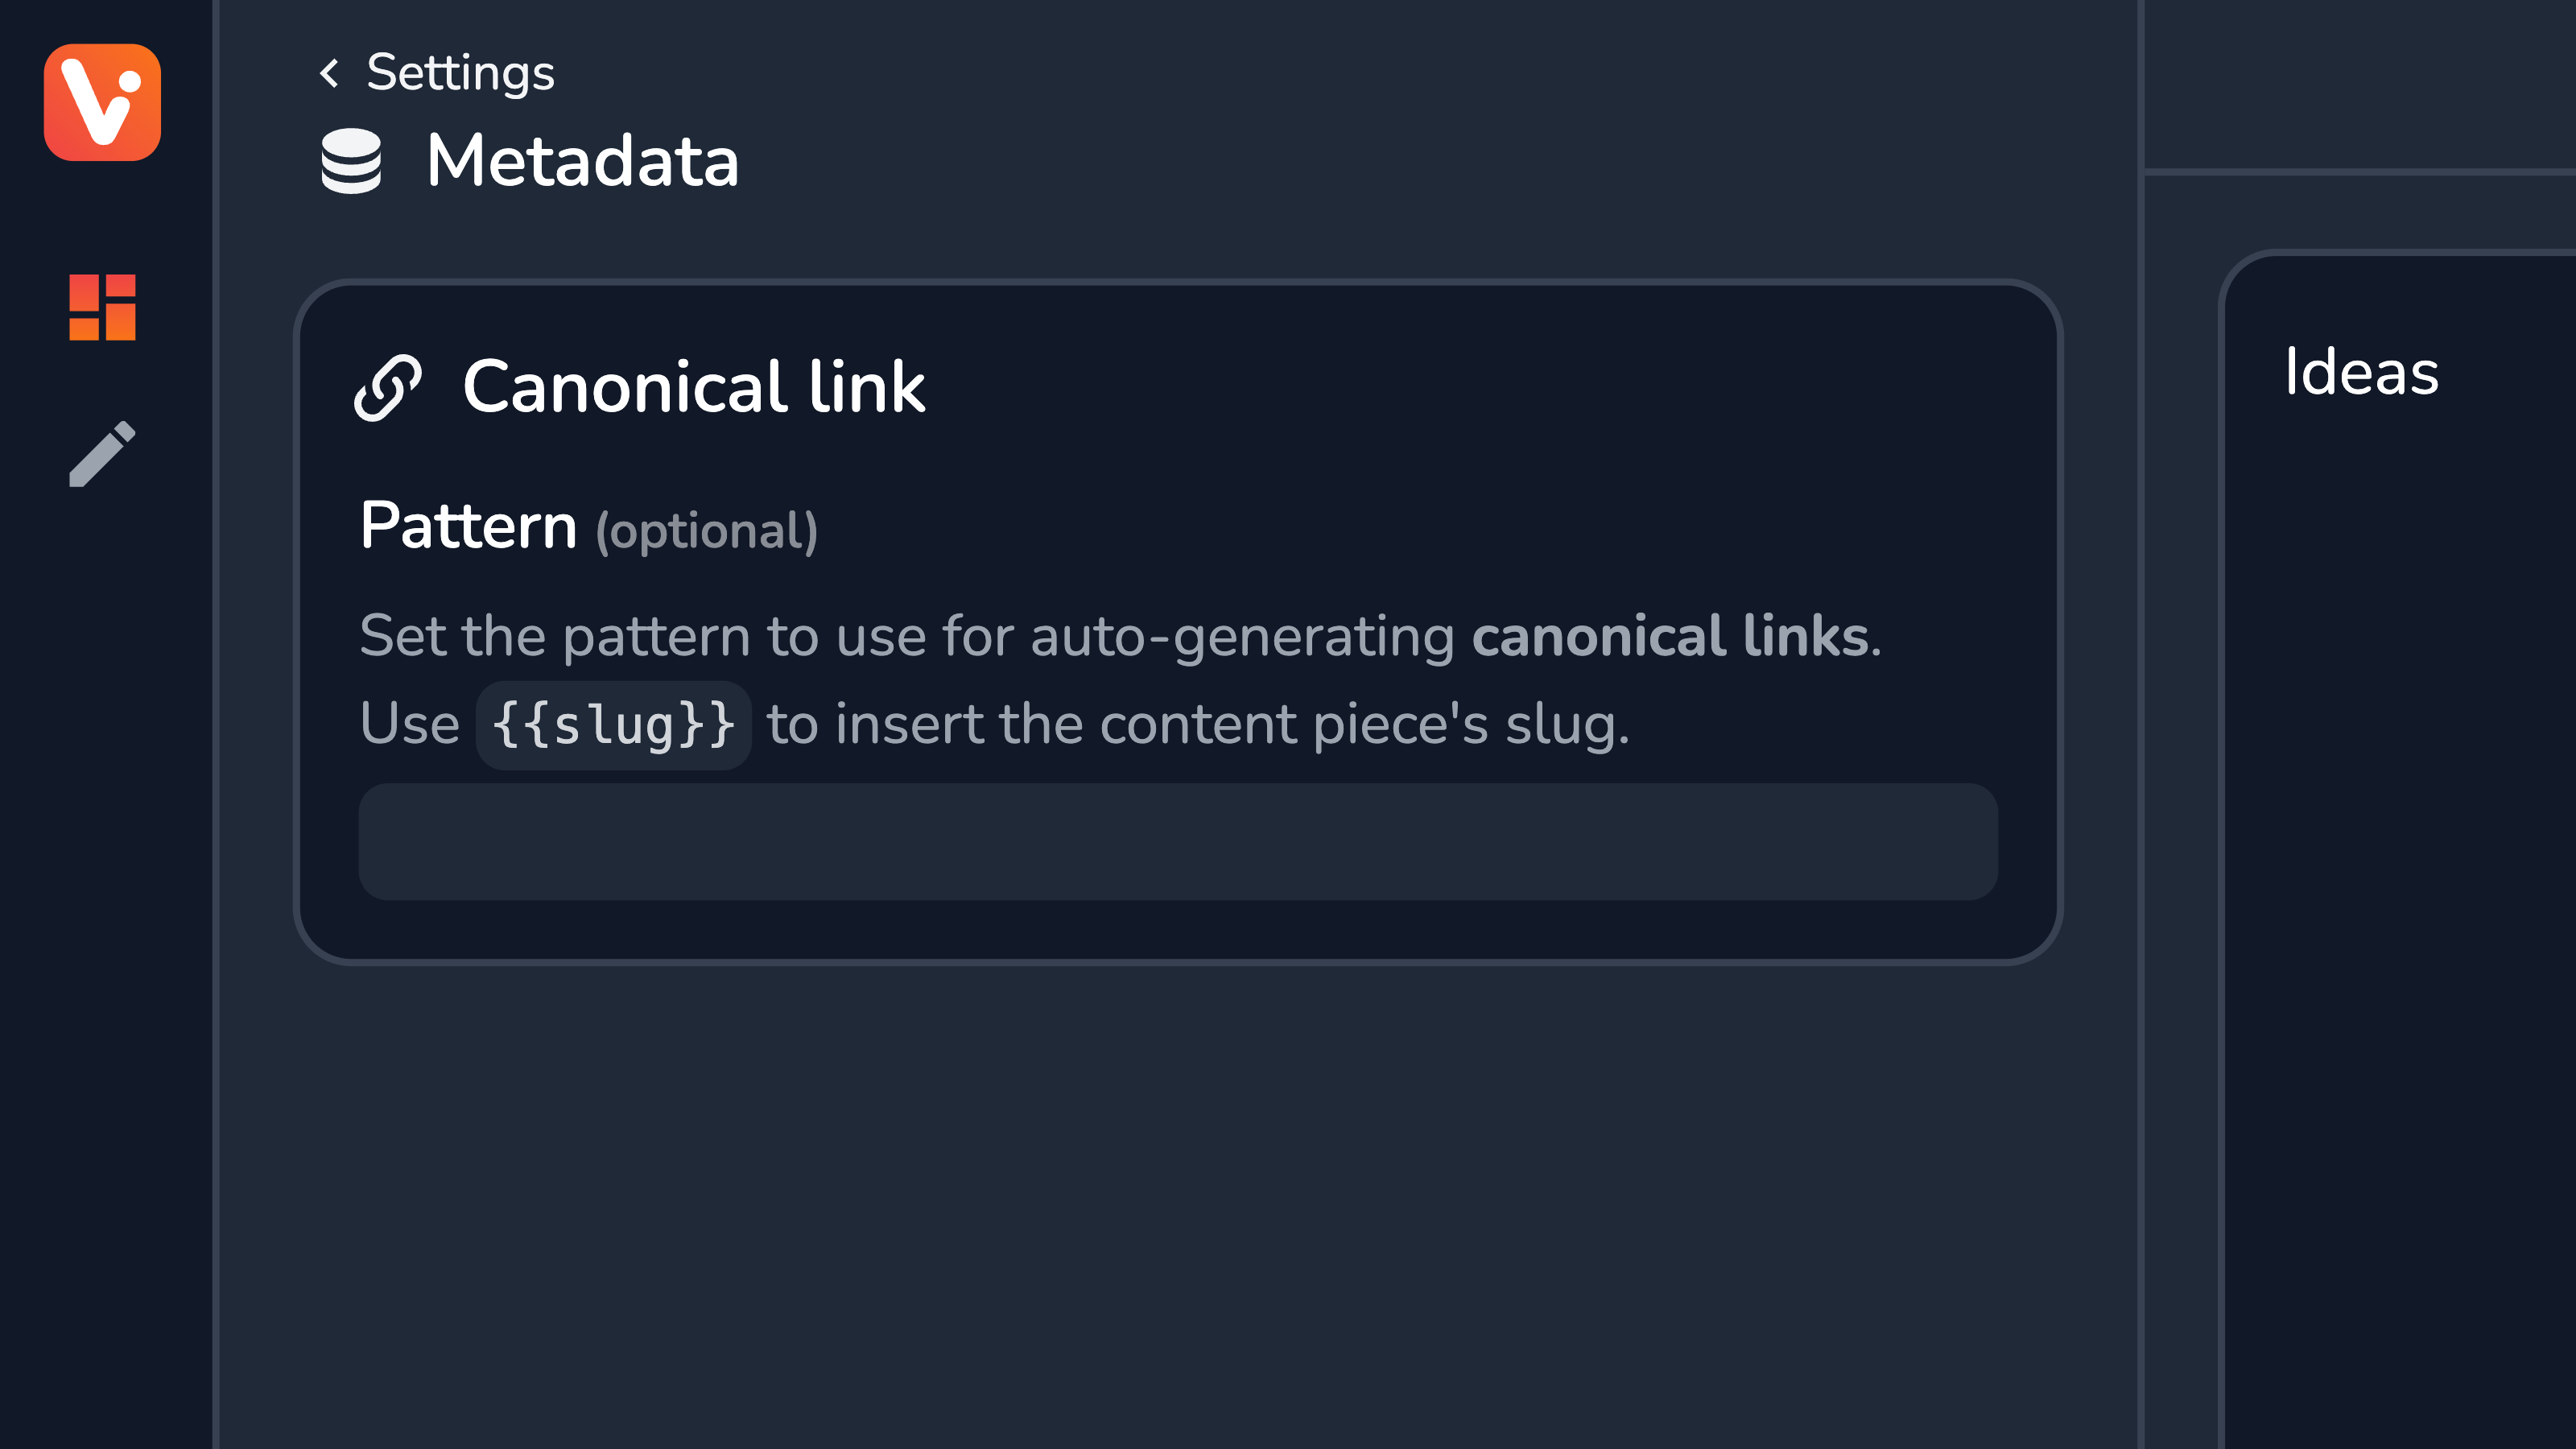
Customizing Metadata Settings
The Metadata section is where you can configure options related to content piece metadata. Right now, it enables you to set a custom pattern for a canonical link which will be used by default for any content piece lacking a custom canonical link. This can be useful if you’re running a publication based on Vrite and cross-post often to different frontends or platforms.
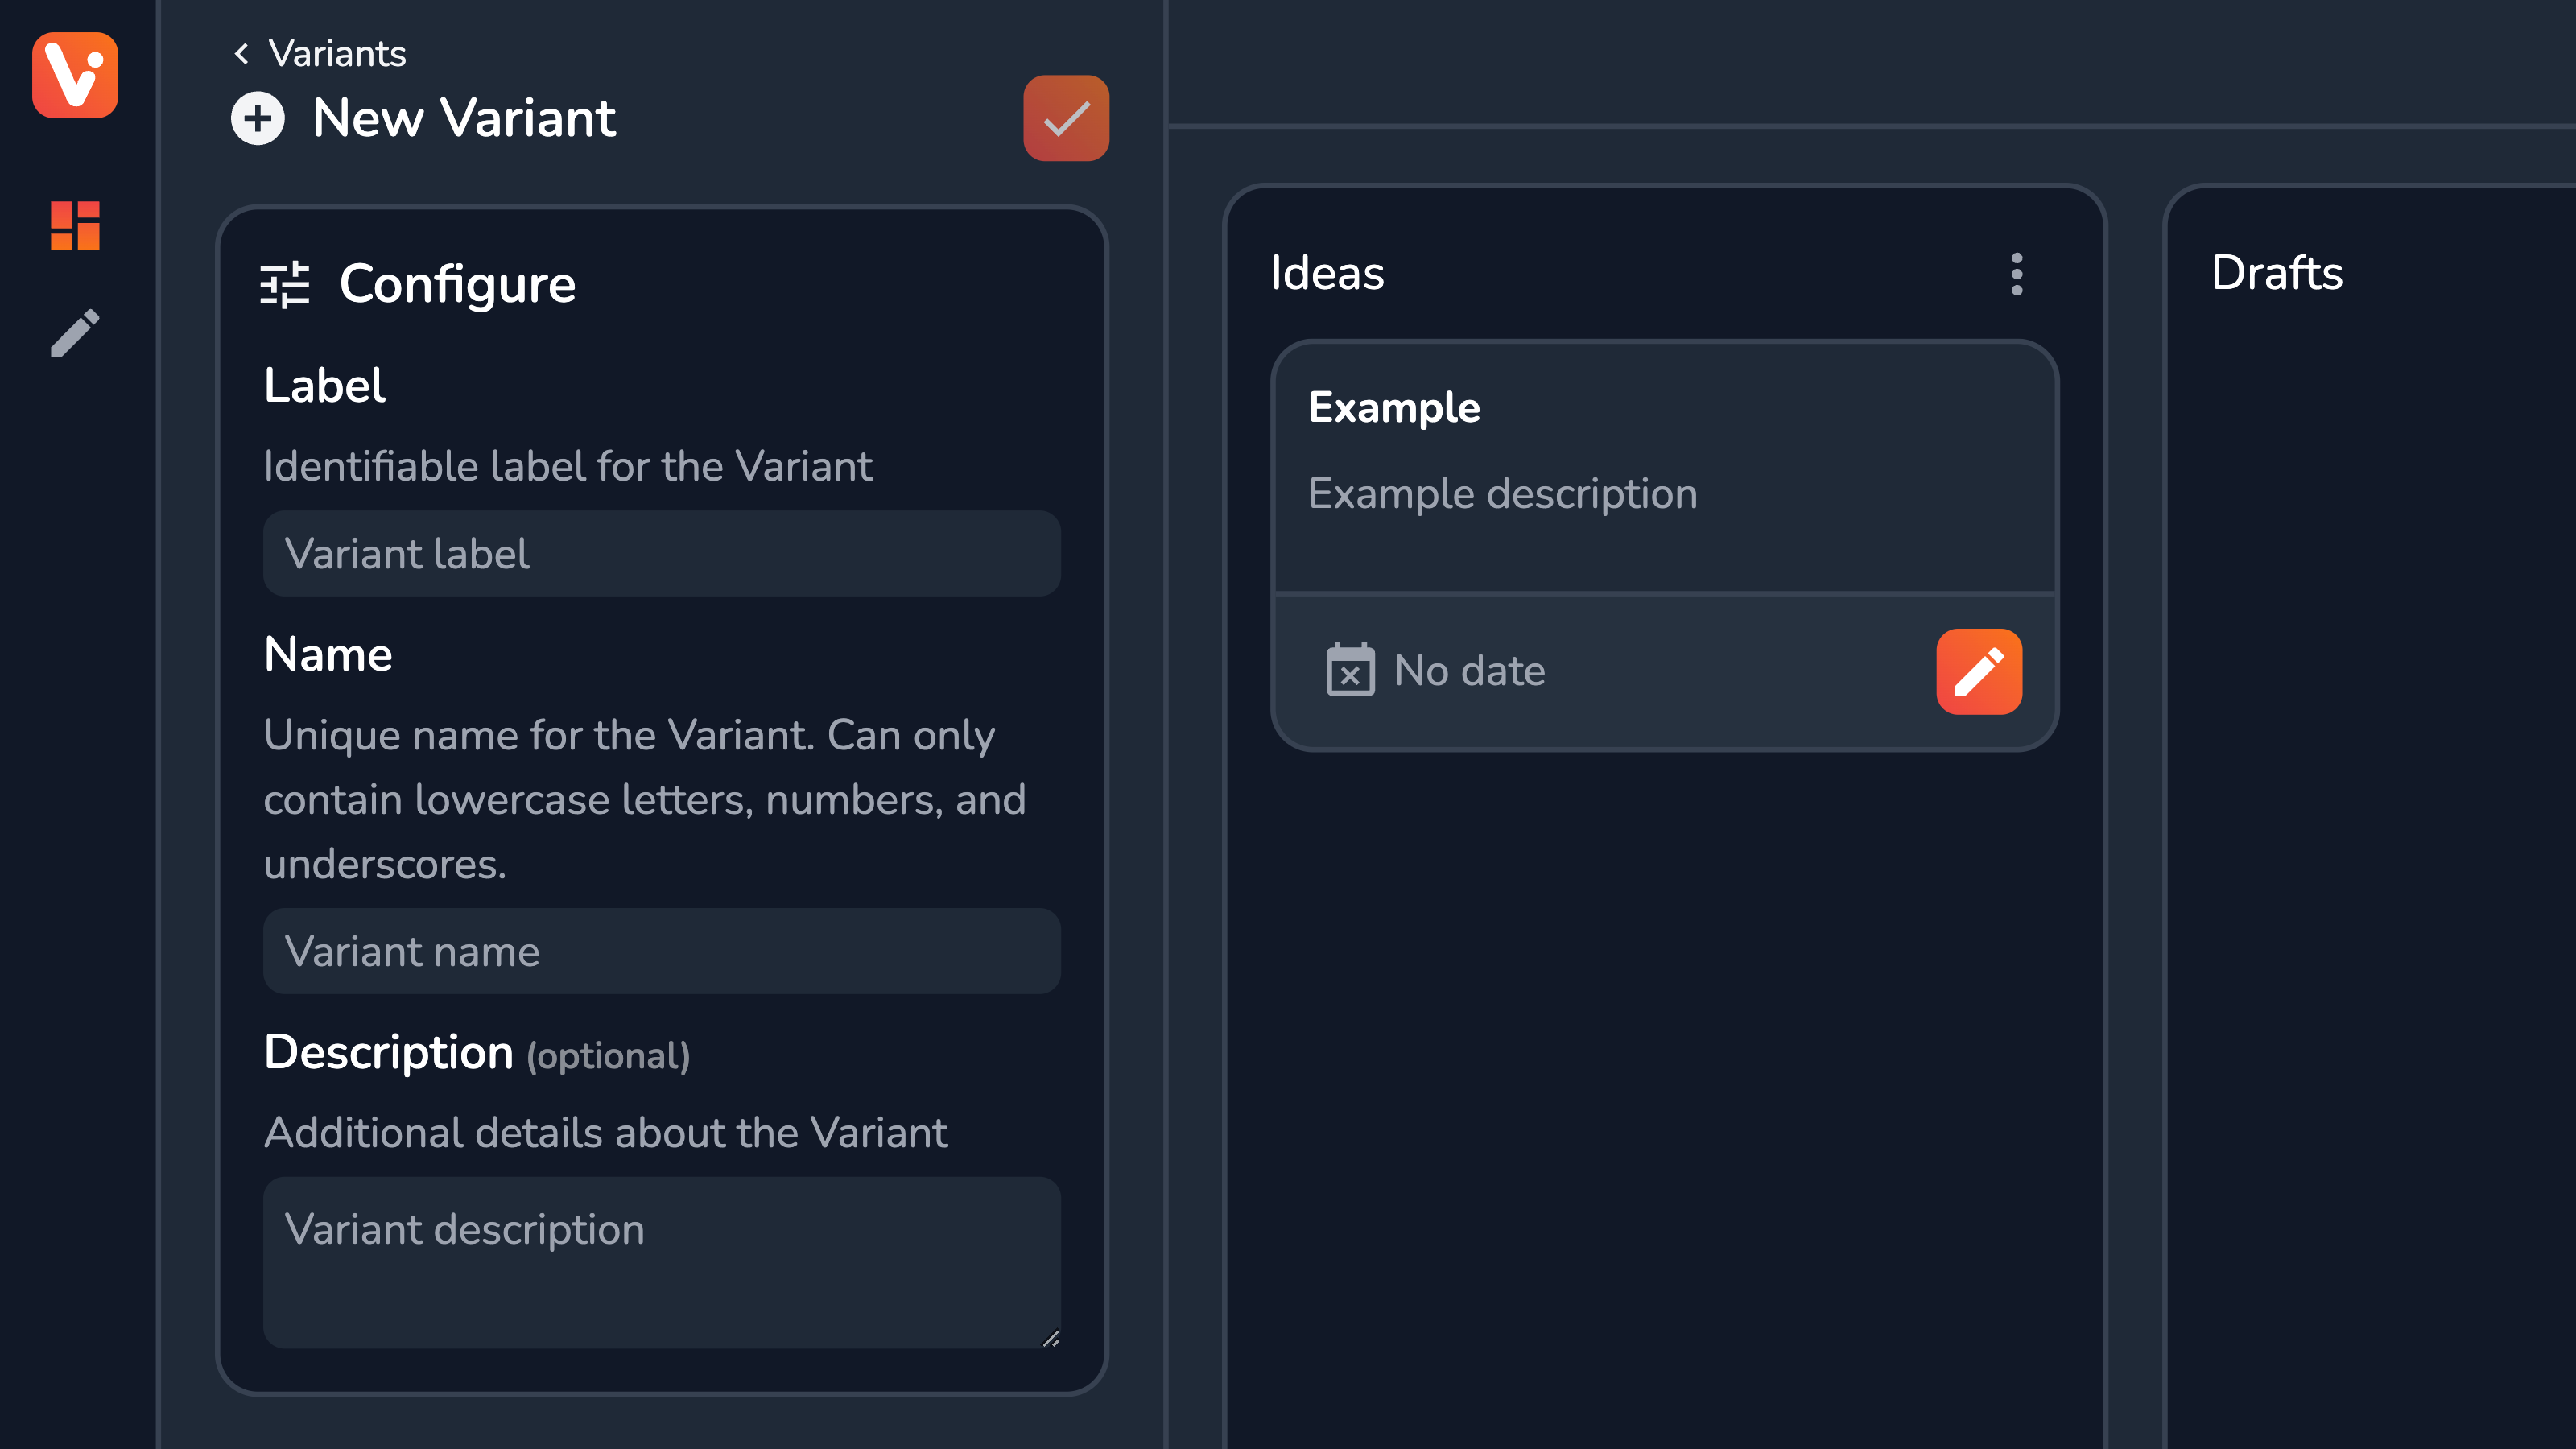
Managing Variants
Content Piece Variants allow you to create and manage different alterations of your content pieces. They serve as “overlays” on top of your Base Variant, i.e. the piece’s default content and metadata and are great for managing multi-language content or for slightly customizing your content for different endpoints.
You can create and manage your Variants in the Variants settings section.
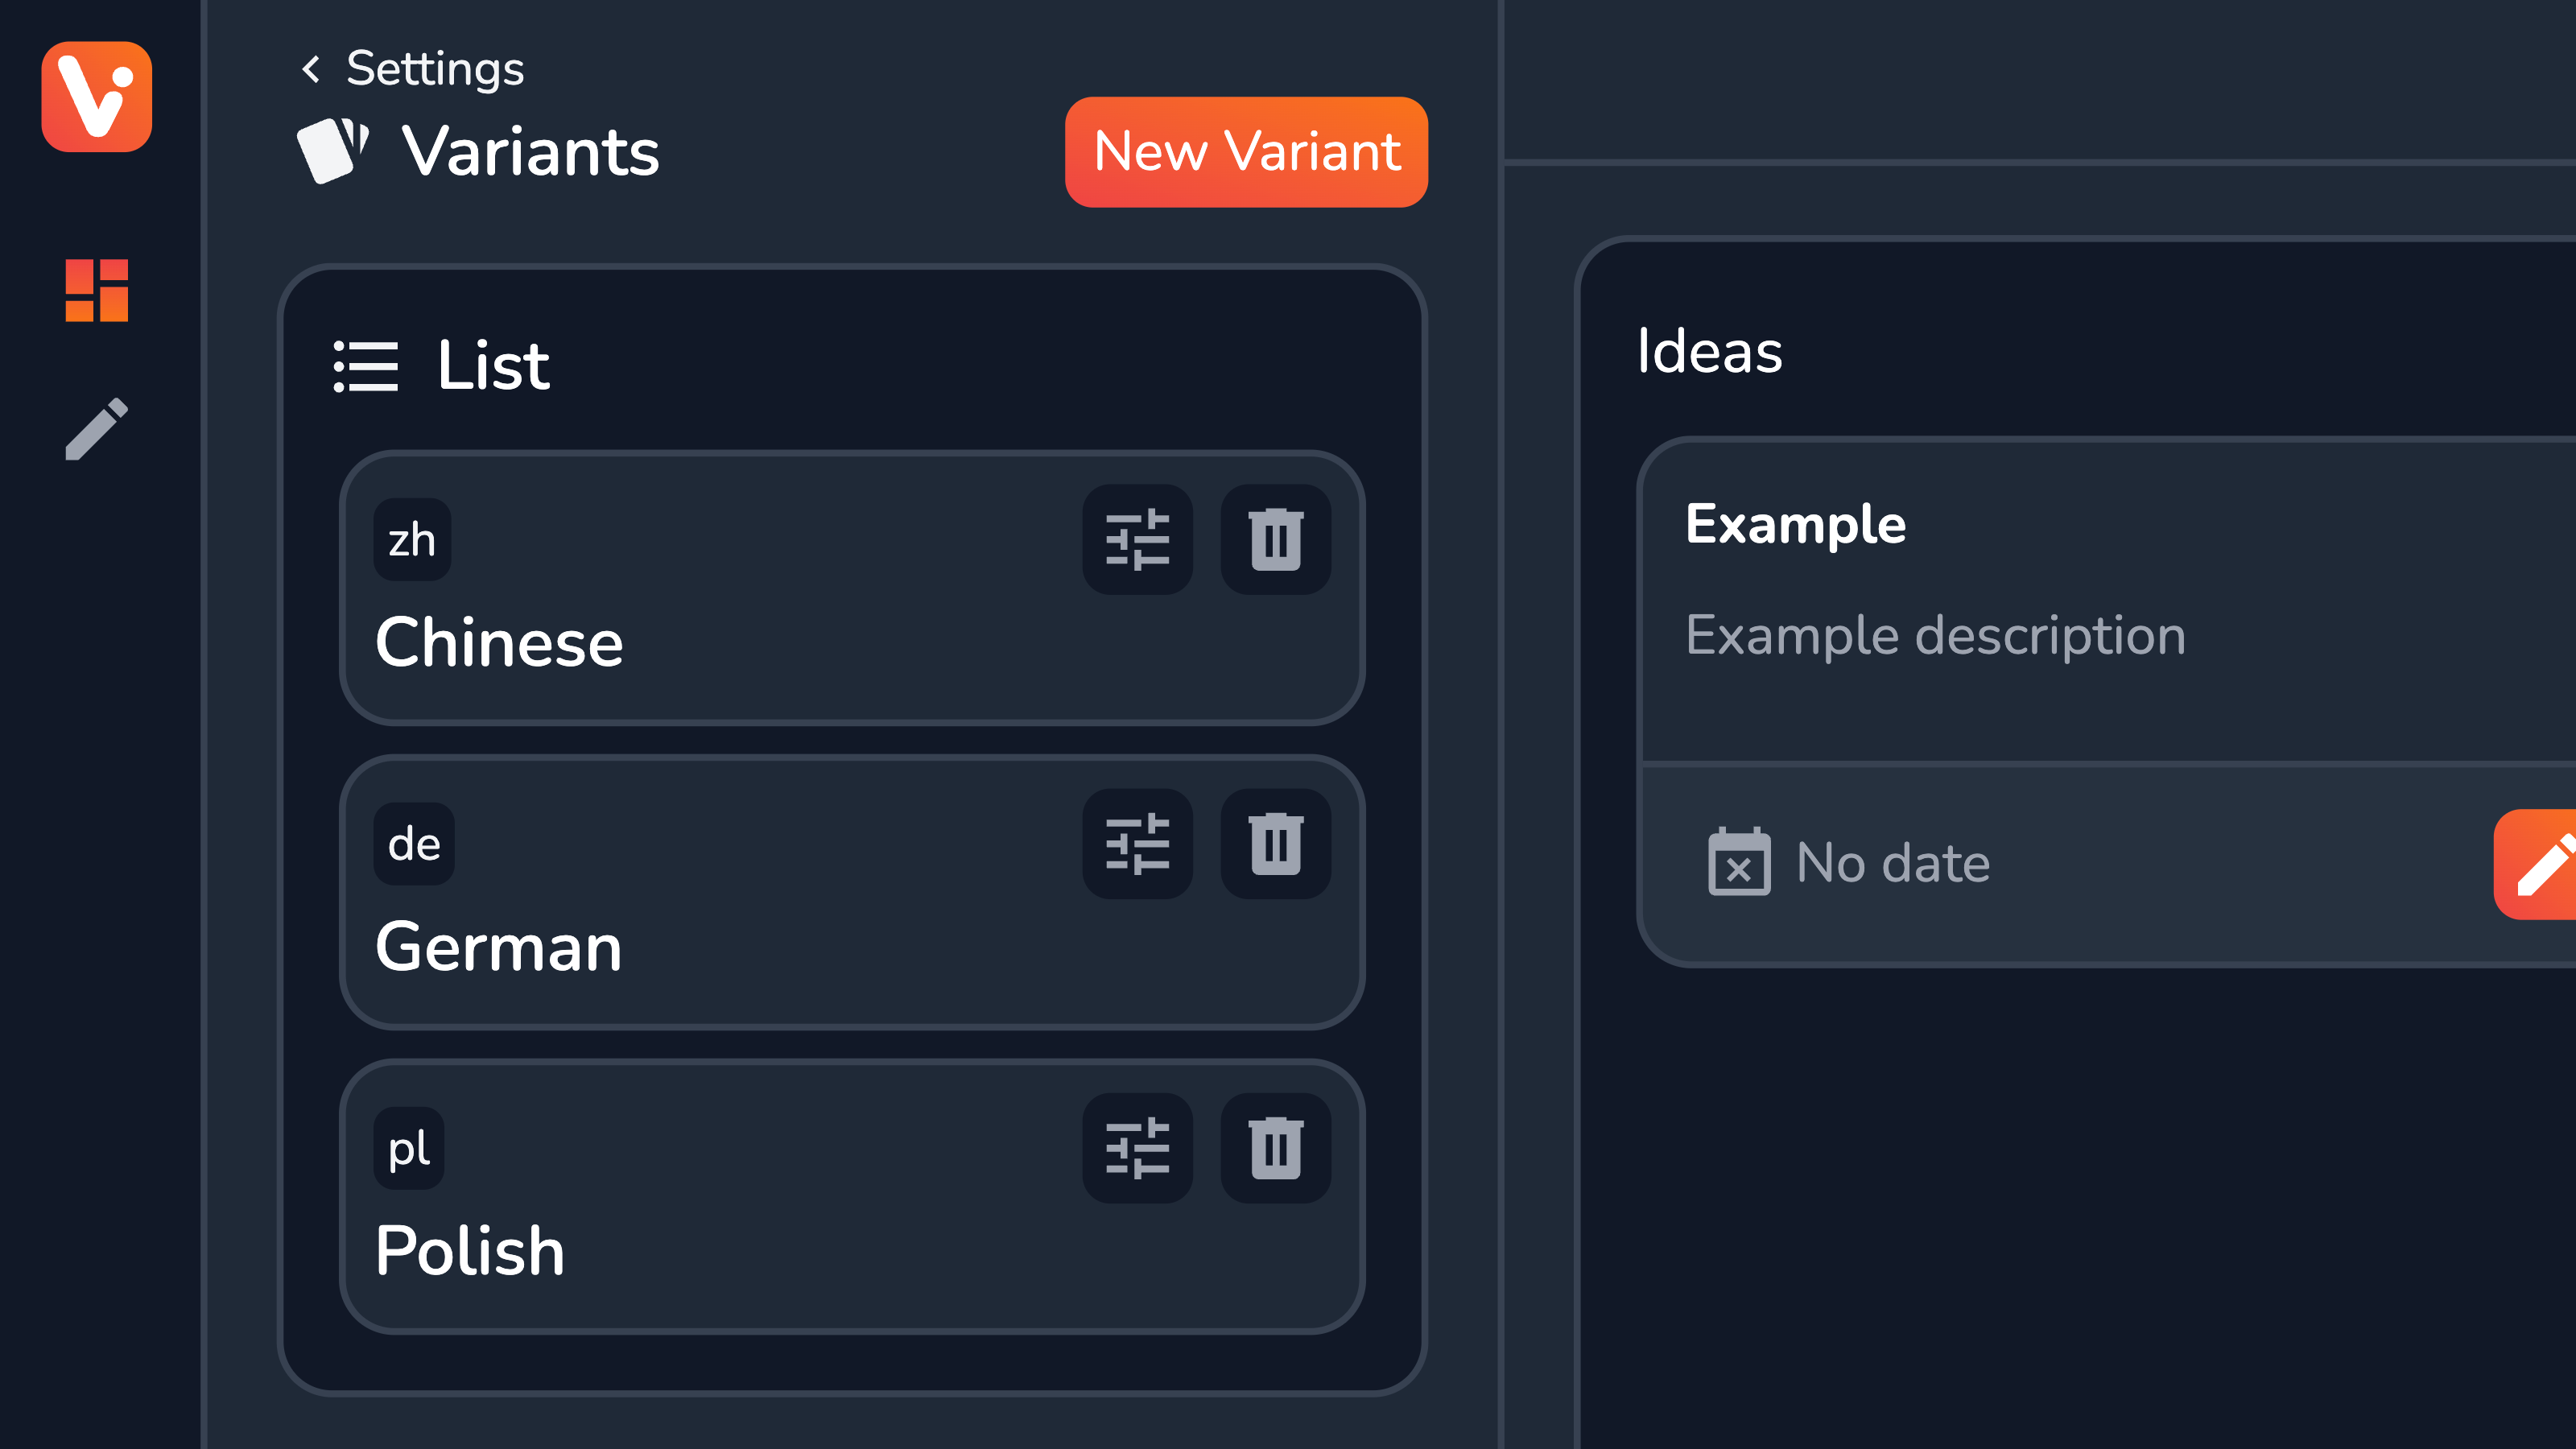
The following details can be configured:
- Label — label for identifying the Variant
- Name — name for the Variant; You’ll be able to use it to retrieve the Content Piece Variants through the API;
- Description — optional description for additional details;